Oblivion:Beldaburo
|
|||
|---|---|---|---|
| # of Zones | 2 | ||
| Occupants | |||
| Conjurers, Daedra, Bones Undead (1 boss-level Conjurer) |
|||
| Important Treasure | |||
| 1 boss-level Ayleid Cask 01 | |||
| Console Location Code(s) | |||
| BeldaburoExterior, Beldaburo, Beldaburo02 | |||
| Region | |||
| Gold Coast | |||
| Location | |||
| Northwest of Anvil, on the coast of the Abecean Sea, south of the Brena River | |||
Beldaburo is a medium-sized Ayleid ruin northwest of Anvil containing conjurers. It contains two zones: Beldaburo and Beldaburo Anga.
Exterior
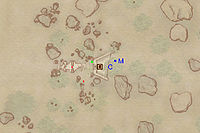
- The exterior is located at coordinates: Tamriel -52, 0.
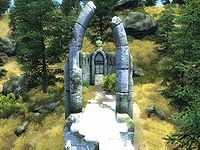
- This location's map marker (M on map) is named Beldaburo (editor name BeldaburoMapMarker). The entrance door is WSW of the marker, 30 feet away.
- 0-2 Conjurer Enemies (each 50% probability Conjurer, 50% Daedra) are near the entrance.
- 1 Chest 04 is near the entrance.
- The following plants can be found near the entrance: 4 Aloe Vera plants, 1 Bergamot plant, and 5 Mandrake plants.
Zone 1: Beldaburo
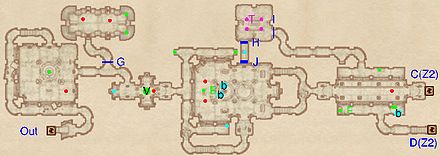
The first zone has the only Varla Stone of the ruin. The cage is opened by an activation block on the floor some distance behind it. The door G is locked, and it opens into the only room in this ruin to contain two leveled skeletons. There is no button or key that controls gate G - it needs to be picked with lockpicks. In the last hallway, both balconies are accessible. The one on the left is reached by a secret door in the previous room (at J) and opened by an activation block on the balcony in that room that oversees the secret entrance. The secret door at H is opened by a pressure plate right in front of it. The balcony to the right of the last hallway is only accessible by door D from the second zone or by jumping up at the balcony opening.
Occupants:
- 3 Conjurers
- 2 Daedra
- 2 Bones Undead
Treasure:
- 1 Varla Stone (in a Varla Stone Cage) at location V on map
- 4 Ayleid Casks 01 (2 locked)
- 1 Ayleid Cask 02
- 1 Ayleid Coffer (locked)
- 1 Chest 03
- 2 Restoration Ayleid Chests
- 11 Welkynd Stones
- The following alchemy equipment will always be found: 2 Novice Alembics, 1 Novice Calcinator, 1 Novice Mortar & Pestle, and 2 Novice Retorts.
- The other following items will always be found: 2 empty lesser soul gems, 1 empty petty soul gem, 1 Bonemeal, 2 Bread Loaves, and 1 Iron Dagger.
- Some of the above items are clustered at the following locations:
- At E: 1 Novice Alembic, 1 Novice Calcinator, 1 Novice Mortar & Pestle, 1 Novice Retort, 1 empty lesser soul gem, and 1 empty petty soul gem.
- At F: 1 Chest 03, 1 Novice Alembic, 1 Novice Retort, and 1 empty lesser soul gem.
Traps:
- 4 Gas traps at location T on map
Doors and Gates:
- There are three doors in/out of this zone
- 1 door (at Out) leads outside.
- 2 doors (at C and D) lead to the zone Beldaburo Anga.
- 2 Gates at G and I (both locked)
- 2 Hidden Doors at H and J. The push block to open door J is on a balcony overlooking the south side of the room (see the cyan dot on the map).
Other:
- 3 bedrolls at locations b on map
Zone 2: Beldaburo Anga
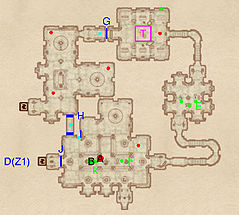
The first room of this zone is largely devoid of treasure, except for a few Welkynd Stones. The second room is guarded by a Conjurer and contains a nasty Ceiling Spikes trap at T. The third room contains two unguarded ayleid casks and a dissection table for a corpse.
The final room is very large, but all the action takes place in the center of the room. The boss-level Conjurer walks around in the center at A and the boss-level Ayleid Cask is located here as well at B. At k is the key to the door at J, which leads to a balcony with a lot of treasure in Beldaburo. In the final room you can press the push block at I for a quick and easy access to the first room of this zone.
Occupants:
Treasure:
- 1 boss-level Ayleid Cask 01 (Conjurer variety; locked) at location B on map
- 2 Ayleid Coffers (1 locked)
- Beldaburo Key at k. It is originally lying on a stone slab, but it is possible for the key to be knocked onto the ground nearby while you are fighting. The key opens the gate at J; it does not open any other gates in the ruin.
- 1 Chest 01
- 1 Restoration Ayleid Chest
- 16 Welkynd Stones
- The following alchemy equipment will always be found: 2 Novice Alembics, 2 Novice Calcinators, 2 Novice Mortar & Pestles, and 2 Novice Retorts.
- The other following items will always be found: 2 empty lesser soul gems and 2 empty petty soul gems.
- Some of the above items are clustered at the following locations:
- At B: 1 Welkynd Stone, 1 boss-level Ayleid Cask 01 (Conjurer variety; locked), 1 empty lesser soul gem, and 1 empty petty soul gem.
- At E: 1 Novice Alembic, 1 Novice Calcinator, 1 Novice Mortar & Pestle, 1 Novice Retort, 1 empty lesser soul gem, and 1 empty petty soul gem.
- At F: 1 Ayleid Coffer, 1 Novice Alembic, 1 Novice Calcinator, 1 Novice Mortar & Pestle, 1 Novice Retort, and 1 Welkynd Stone.
Traps:
- 1 Ceiling Spikes trap at location T on map
Doors and Gates:
- There are two doors (at C and D) in/out of this zone, both leading to the zone Beldaburo.
- 1 Gate at J (locked, key required; opened by the Beldaburo Key, located on a stone slab at k)
- 2 Hidden Doors at H and I
- 1 Iron Gate (opened remotely) at G


