Skyrim:Reachcliff Cave
|
|||
|---|---|---|---|
| # of Zones | 1 | ||
| Occupants | |||
| Draugr | |||
| Important Treasure | |||
| The Doors of Oblivion | |||
| Console Location Code(s) | |||
| ReachcliffCave01, ReachcliffCaveExterior, ReachcliffCaveExit | |||
| Region | |||
| The Reach | |||
| Location | |||
| Northeast of Dushnikh Yal | |||
Reachcliff Cave is a small cave filled with draugr located northeast of Dushnikh Yal and southeast of Markarth.
The cave is also the plot location for the quest The Taste of Death and is noted to be the location of the shrine of Namira. When not on the related quest, the cave can only be partly explored.
Related Quests
- The Taste of Death: Prepare a feast for the Lady of Decay.
Walkthrough
Exterior
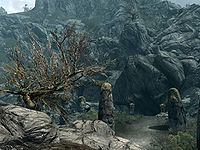
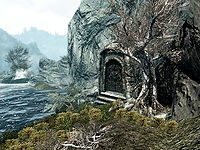
There is a path that leads from the main road heading west to Markarth, up to the entrance. It starts opposite the road to Karthspire Camp. It takes a couple of turns and as you near the entrance there are some upright stones on either side. There are three imp stool fungus around the entrance. During the related quest, when you arrive you will find Eola standing in front awaiting you. She will speak to you and you can ask her to join you even if you already have a follower—(see bugs). The cave has another entrance north of Dushnikh Yal with a map marker called Reachcliff Secret Entrance which counts as a second location for the "Locations Discovered" statistic. However this entrance doesn't exist until you use it as an exit. Nearby this secret entrance are two leveled animals.
Reachcliff Cave
The entrance descends to the south in what appears to be mined tunnels with wooden posts shoring up the sides and roof. The tunnel leads out onto a ledge overlooking a chamber with an open sarcophagus on the right containing a leveled draugr and another draugr out of sight, at the top of some stairs at the rear of the chamber. They will both attack as soon as they are alerted to your presence. There is nothing else of interest in this room. At the top of the stairs at the rear is another passage descending east before turning south and exiting into another chamber, with a rock pillar in the middle and stairs down to the left. It contains two more leveled draugr, one of which is a magic-user. There are several steps down to the bottom of the chamber and a passage heading west into some catacombs.
At the first crossroads there is a draugr slumbering upright in an alcove opposite and a burial urn in an alcove on your right. Next to this to your right is a broken sideboard with a random shield and a random potion of magicka on top. There are passages to the south and west. To the south it enters a walkway over a chamber containing two draugr, one of them a magic-user. The walkway leads out to a pillar, with a second pillar to the left with a chest beside it. The chest has a novice level trap that triggers a poison dart trap from the pillar behind. From here you can either drop into this chamber or return to the crossroad and follow the passage west. Heading west are stairs that lead down to a small area containing an iron ore vein and then another passage eventually enters the same chamber through the doorway to the west. There is nothing else in this chamber of interest. There is a second doorway to the south that leads directly into a room with an upright sarcophagus on the wall opposite that bursts open as soon as you enter the room. There is an unlocked chest and two large urns to your left. To your right are two burial urns to the right of a sarcophagus and with a set of shelves in front holding a level potion of magicka, a level potion of true shot, a random helmet, six common books, an iron dagger and a copy of the Conjuration skill book The Doors of Oblivion. To the right of the shelves is another burial urn. Prior to the related quest this is as far as you can explore. However during the quest, the sarcophagus to the right is open and backless with a tunnel behind.
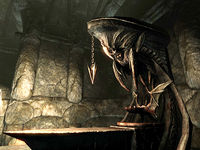
The tunnel descends to an open concealed door with a handle to the left and enters a short passage with two large statues on either side, three burial urns and a leveled potion of healing on the left, opposite another concealed door and an iron door at the far end. Through the door is a room containing two leveled draugr standing or wandering and a third highest possible level draugr up to Death Overlord sat on a throne at the far end of a long stone table. that is on a raised section down the length of the room, with four stone benches on either side. There are many burial urns and large urns around the room including a row of four on either side of the shrine to Namira at the rear of the room, behind the throne. There is a sets of shelves on either side of the table; the one on the right holds a pair of iron boots, while the other holds two goblets and two common books. To the right of the throne is a boss level chest.
Once the boss draugr is defeated the concealed door in the passageway lowers giving access to the secret entrance and the open concealed door you entered the passage through will have closed. There is a chain to the right. Eola will eventually join you inside and give you instructions to bring someone to a special feast as part of the related quest. There is a tunnel behind the second concealed door that leads along a tunnel to another small room contain two large urns, a sideboard holding two common books and an iron door that leads outside.
When you return with Brother Verulus, the shortest route is through the secret entrance. You need to lead him to the final room. When you get there you will find the long table has been laid and a number of other guests are already sat waiting for you. They are in addition to Eola, Banning, Lisbet and Hogni Red-Arm from Markarth and two others Sanyon and Nimphaneth. On the table are three bottles of alto wine, five bottles of Nord mead, two bottles of wine, three sweet rolls, a gourd, two potatoes, several loaves of bread and pieces of cheese, two pieces of human flesh and many gory human bones. One of the sets of shelves has two more bottles of alto wine, a bottle of wine and several more pieces of cheese.
Bugs
- Eola will keep interrupting you for as long as you are near her with the same conversation and options to ask her to help. ?
- You can have both Eola and your usual follower simultaneously, however, Eola has bad aim and will hit your follower, leading them to attack each other until one is dead. If Eola dies, the quest is failed. ?


