Oblivion:Wenyandawik
|
|||
|---|---|---|---|
| # of Zones | 2 | ||
| Occupants | |||
| Undead (1 boss-level Undead) |
|||
| Important Treasure | |||
| 1 Ayleid Statue 1 boss-level Ayleid Coffer |
|||
| Console Location Code(s) | |||
| WenyandawikExterior, Wenyandawik, Wenyandawik02 | |||
| Region | |||
| Great Forest | |||
| Location | |||
| Northwest of Bravil, south of Inn of Ill Omen | |||
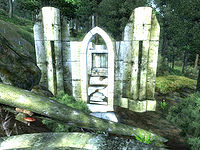
Wenyandawik is a medium-sized Ayleid ruin northwest of Bravil containing undead (quest-related). It contains two zones: Wenyandawik and Wenyandawik Edesel.
Related Quests
- The Collector: Help Umbacano, a collector of ancient artifacts, recover the "Ten Ancestors", a set of ancient Ayleid statues.
Notes
- This ruin can be entered, fully explored and all items retrieved without starting the related quest. Selling the Ayleid Statue found in Wenyandawik is one way to start the quest.
- There is an Ayleid Well right next to the entrance, which will supply you with some potentially useful extra Magicka.
Exterior
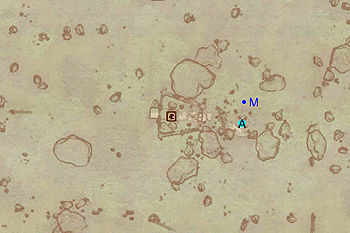
- The exterior is located at coordinates: Tamriel 8, -5
- This location's map marker (M on map) is named Wenyandawik (editor name WenyandawikMapMarker). The entrance door is WSW of the marker, 90 feet away.
- 1 Wilderness Creature (Forest variety) is near the entrance
- The following plants can be found near the entrance: 11 Fly Amanita plants, 5 Green Stain Cup plants, 24 Monkshood plants, 1 Nightshade plant, 4 Somnalius plants, and 1 Summer Bolete plant
- 1 Ayleid Well is at location A on map
Zone 1: Wenyandawik
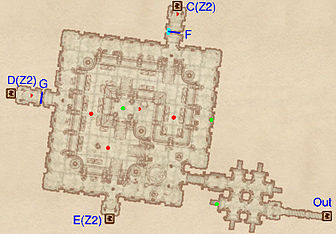
This zone is fairly straightforward. The main decision is which of the three doors to take to get to the second zone: D is initially inaccessible, leaving a choice between C and E. The northern door (C) is recommended because it leads to the valuable items and you will not have to backtrack in order to get everything in Zone 2.
Occupants:
Treasure:
- 2 Ayleid Casks 01 (both locked)
- 1 Ayleid Cask 02
- 12 Welkynd Stones
Doors and Gates:
- There are four doors in/out of this zone
- 1 door (at Out) leads outside
- 3 doors (at C, D, and E) lead to the zone Wenyandawik Edesel
- An Ayleid Iron Gate (F) blocks access to the northern exit door (C), but the gate is easily opened by the activation blocks (cyan dots) located on both sides of the gate.
- An Ayleid Iron Gate (G) blocks access to the western exit door (D). This gate can only be opened from the other (west) side. The gate will automatically open when you approach it from the west.
Zone 2: Wenyandawik Edesel
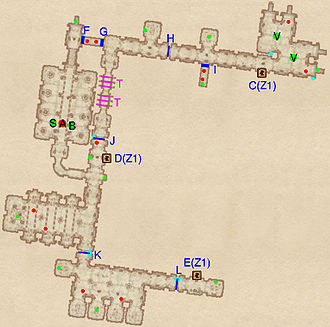
If you enter this zone through the southern door (E), you can explore the southern half of the area, but access to the rest of the area is blocked by the gate at J, which cannot be opened from the south. You are forced to exit back into the first zone through the western door (D).
If you enter this zone through the northern door (C), you have access to the Varla Stones (V), Ayleid Statue (S), and boss chest (B), and can also explore the entire area. Be careful, however, while exploring because there are several doors that are automatically triggered as you walk past.
- In particular, it is possible to permanently lock yourself out of the northwest room containing the Ayleid statue. When you pass through the gate at H it will automatically close behind you. If you want to later re-enter this area you must go through the swinging blade traps at T and open gate J BEFORE entering the room containing the statue. The alternative is to go up the stairs into the northwest room and then leave that room using the southern door, which leads to a bridge over the main corridor. Do not jump down off that bridge, especially if you have not yet grabbed the statue. You will jump down outside the locked area, and it is impossible to get back in again, as you cannot open gate J. (On the PC, you can use the
tclconsole command to get through the door. Or using a combination of the floating paint brushes glitch and/or high Acrobatics skill it is possible to jump back up onto the bridge).
Occupants:
Treasure:
- 1 Ayleid Statue at location S on map
- 1 boss-level Ayleid Coffer (Undead variety; locked) at B
- 2 Varla Stones at V. Both Varla Stones are within Varla Stone Cages; the activation blocks for the stones are located in the same room, at the cyan dots on the map.
- 6 Ayleid Casks 01 (2 locked)
- 4 Ayleid Casks 02 (2 locked)
- 1 Restoration Ayleid Chest
- 12 Welkynd Stones. 8 are on pedestals in the room with the Statue and 4 are in the next room to the south.
Traps:
- 6 Swinging Blade traps at locations T on map
Doors and Gates:
- There are three doors (at C, D, and E) in/out of this zone, all leading to the zone Wenyandawik
- F and G are two hidden doors which automatically open when you approach them, releasing two undead.
- H is an Ayleid Iron Gate that is initially open, and only closes once you walk through it. Warning: once this gate closes it can never be reopened.
- I is a hidden door, hiding a side alcove with an Ayleid Cask and two undead. The door automatically opens when you enter the alcove to the north of it.
- J is an Ayleid Iron Gate that can only be opened from the north (i.e., by walking through the swinging blade traps at T), using the activation block (cyan dot). If you want to be able to return to the boss treasure room you must open this gate.
- K and L are two Ayleid Iron Gates that can easily be opened using activation blocks (cyan dots) located on either side of each gate.


