Oblivion:Wendelbek
|
|||
|---|---|---|---|
| # of Zones | 4 | ||
| Occupants | |||
| Necromancers, Zombie Undead (1 boss-level Necromancer) |
|||
| Important Treasure | |||
| 1 Ayleid Statue 2 boss-level Ayleid Coffers |
|||
| Console Location Code(s) | |||
| WendelbekExterior, Wendelbek, Wendelbek02, Wendelbek03, Wendelbek04 | |||
| Region | |||
| Nibenay Basin | |||
| Location | |||
| East of a small lake formed by the northern branch of Panther River | |||
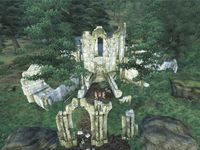
Wendelbek is a large Ayleid ruin east of Bravil containing necromancers (quest-related). It contains four zones: Wendelbek, Wendelbek Aldmerisel, Wendelbek Sel Aran Mathmedli, and Wendelbek Silaseli.
Related Quests
- The Collector: Help Umbacano, a collector of ancient artifacts, recover the "Ten Ancestors", a set of ancient Ayleid statues.
Notes
- This ruin can be entered, fully explored and all items retrieved without starting the related quest.
- This is one of the four locations mentioned in the Hastily Scrawled Note left by Falcar (Mages Guild quest Necromancer's Moon) which has an altar that can be used for creating Black Soul Gems. The altar is outside the ruin, near the door leading inside.
- This ruin is notable for having the most Welkynd Stones (58) of any location.
Exterior
- The exterior is located at coordinates: Tamriel 39, -13
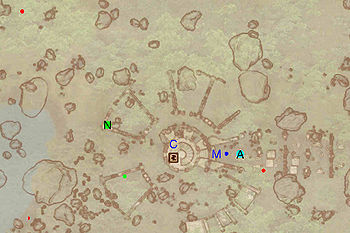
- This location's map marker (M on map) is named Wendelbek (editor name WendelbekMapMarker). The entrance door is W of the marker, 60 feet away.
- 0-1 Mud Crab is near the entrance
- 1 Wilderness Creature (Forest variety) is near the entrance
- 1 Wilderness Creature (Valley variety) is near the entrance
- 1 Nirnroot is at location N on map
- 1 Restoration Ayleid Chest is near the entrance
- The following plants can be found near the entrance: 9 Dragon's Tongue plants, 50 Foxglove plants, 4 Green Stain Cup plants, 2 Monkshood plants, 8 Domica Redwort plants, 9 Somnalius plants, and 7 Summer Bolete plants
- 1 Necromancer Altar is at location A on map
Zone 1: Wendelbek
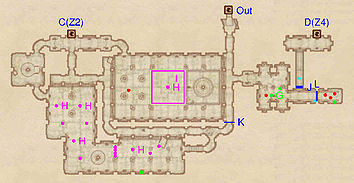
This zone is quite complicated, with a good amount of intersects and looping corridors. Upon entering, you will find yourself in a corridor overlooking a large room. From here you have two choices: on the left is a room containing a Necromancer, four Welkynd Stones, a full set of Novice Apparatus and two Soul Gems. If you continue straight you will find a small room with three zombies. These can be easily dealt with, since the gate at L prevents them from reaching you. Simply cast target spells or ranged attacks at them through the hole in the gate. Also nearby is door D, which is only accessible from Wendelbek Silaseli.
To continue, you can either pick the Hard-locked gate at K or jump down into the room. While there, be careful to avoid being trapped inside Gas Room at I. This might also be useful to fight the Necromancer nearby. To reach door C to Wendelbek Aldmerisel, you will have to go through a room full of Gas Traps (H). Most of these can be easily passed, but expect to take some damage when passing through the bottleneck in the middle, as the traps there are lined up.
Occupants:
- 2 Necromancers (non-respawning)
- 3 Zombie Undead
Treasure:
- 1 Ayleid Cask 01
- 1 Ayleid Casks 02 (locked)
- 1 Ayleid Cask 01 (locked)
- 1 Restoration Ayleid Chest
- 4 Welkynd Stones. All four are found in the room to the left of the entrance; high up on their pedestals. See the Welkynd Stone article for suggestions on how to reach them.
- The following alchemy equipment will always be found: 1 Novice Alembic, 1 Novice Calcinator, 1 Novice Mortar & Pestle, and 1 Novice Retort
- The other following items will always be found: 1 empty lesser soul gem and 1 empty petty soul gem
- Some of the above items are clustered at location G: 1 Novice Alembic, 1 Novice Calcinator, 1 Novice Mortar & Pestle, 1 Novice Retort, 1 empty lesser soul gem, and 1 empty petty soul gem
Traps:
Doors and Gates:
- There are three doors in/out of this zone
- 1 door (at Out) leads outside
- 1 door (at C) leads to the zone Wendelbek Aldmerisel
- 1 door (at D) leads to the zone Wendelbek Silaseli
- 1 Gate at K (locked)
- 1 Hidden Door at J
- 1 Iron Gate (opened remotely) at L
Zone 2: Wendelbek Aldmerisel
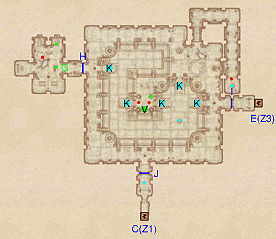
This level mainly consists of a large room with different levels and two smaller rooms at its sides. Upon entering, you will find yourself on a corridor at the edge of the aforementioned room. The center of the room is mostly on a lower level, except a portion which is at your own. Here you will find two Necromancers, a Varla Stone, a full set of Novice apparatus, and a well-hidden chest inside a column. If you fall down, inside a column in the southeast of the room is the switch (cyan dot on the map) that activates the five stone steps at K.
There are two rooms located slightly off-course: one is on the west side of the large room while the other is accessible from the northeast side of the same room. To enter the first, you will have to pick the Hard lock on gate H; inside are a Necromancer, another full set of Novice apparatus, two Soul Gems and three Welkynd Stones. The other is a long corridor, at the end of which is the switch that activates gate I, which initially prevented you from reaching door E to Wendelbek Sel Aran Mathmedli.
Occupants:
- 4 Necromancers (non-respawning)
Treasure:
- 1 Varla Stone at location V on map
- 1 Ayleid Cask 01 (locked)
- 1 Ayleid Cask 02
- 18 Welkynd Stones. 12 can be found on the raised walkway surrounding the main chamber in pairs on their pedestals, 3 can be found together inside a brazier in the raised center of the same chamber, and the final 3 can be found in the westernmost room (two high up on pedestals and one hidden in a nook on the floor in the northwest corner).
- The following alchemy equipment will always be found: 2 Novice Alembics, 2 Novice Calcinators, 2 Novice Mortar & Pestles, and 2 Novice Retorts
- The other following items will always be found: 1 empty lesser soul gem and 1 empty petty soul gem
- Some of the above items are clustered at the following locations:
- At G: 1 Novice Alembic, 1 Novice Retort, 1 empty lesser soul gem, and 1 empty petty soul gem
- At V: 1 Novice Alembic, 1 Novice Calcinator, 1 Novice Mortar & Pestle, 1 Novice Retort, and 1 Varla Stone
Doors and Gates:
- There are two doors in/out of this zone
- 1 door (at C) leads to the zone Wendelbek
- 1 door (at E) leads to the zone Wendelbek Sel Aran Mathmedli
- 1 Gate at H (locked)
- 2 Iron Gates (opened remotely) at I and J
Other:
- 5 Stone Steps (rise to form steps when activated) at locations K on map
Zone 3: Wendelbek Sel Aran Mathmedli
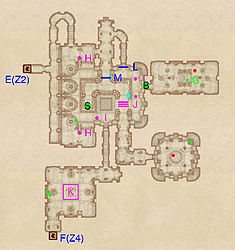
Like the first level, this one is also quite complex, with winding corridors and several side rooms. Upon entering, you will find yourself on a corridor overlooking a room. Be careful while moving around since the two Dark Welkynd Stones at H will keep shooting at you.
There are two chests that can be easily overlooked in this room: the first is hidden inside a column on a ledge which can only be reached by heading right from the entrance and then jumping down. The second is actually the Boss chest (B). It is located in the eastern side of the room and can only be accessed by jumping from the middle platform, next to the Falling Blade Trap at J. A high Acrobatics skill (75 or higher) is recommended. An alternative method is jumping onto the portions of wall jutting out into the room from the platform near gate M until you reach the chest.
In the next corridor, which also contains a Welkynd Stone, is an intersection; if you head straight, you will be able to take the Ayleid Statue (S), required for the related quest. If you pass the Falling Blade Trap, you can enter a chamber containing a Necromancer and eight Welkynd Stones.
If you instead head left, you will find yourself on a lower level with several gas traps (I). From here you can reach two rooms: from the east side of the room you arrive inside a chamber with one Necromancer, five Welkynd Stones, a full set of Novice Apparatus and two Soul Gems. From the southeast corner of the room, you can reach door F to Wendelbek Silaseli. In the room, be mindful of the Spike Pit Trap at K.
Occupants:
- 2 Necromancers (non-respawning)
Treasure:
- 1 Ayleid Statue at location S on map
- 1 boss-level Ayleid Coffer (Necromancer variety) at B
- 4 Ayleid Casks 01 (2 locked)
- 1 Ayleid Cask 01
- 1 Restoration Ayleid Chest
- 14 Welkynd Stones. The first is high up on a pedestal due north of M, 8 are on pedestals in the southeastern room, and 5 are found in the eastern room (one on the floor near the entrance, three on pedestals, and one on the floor near the empty pedestal at G).
- The following alchemy equipment will always be found: 1 Novice Alembic, 1 Novice Calcinator, 1 Novice Mortar & Pestle, and 1 Novice Retort
- The other following items will always be found: 1 empty lesser soul gem and 1 empty petty soul gem
- Some of the above items are clustered at location G: 1 Ayleid Cask (locked), 1 Novice Alembic, 1 Novice Calcinator, 1 Novice Mortar & Pestle, 1 Novice Retort, 1 empty lesser soul gem, and 1 empty petty soul gem
Traps:
- 1 Spike Pit trap at location K on map
- 2 Dark Welkynd Stone traps at H
- 3 Falling Blade traps at J
- 3 Gas traps at I
Doors and Gates:
- There are two doors in/out of this zone
- 1 door (at E) leads to the zone Wendelbek Aldmerisel
- 1 door (at F) leads to the zone Wendelbek Silaseli
- 1 Gate at L (locked)
- 1 Iron Gate (opened remotely) at M
Zone 4: Wendelbek Silaseli
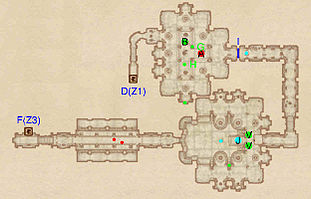
Like the second level, this one is pretty straightforward: simply fight your way through the various rooms until you reach door D, which leads back to Wendelbek. In the second room you enter, you will need to step on the pressure plate (cyan dot on map) to activate the Stone Steps at J. Two Varla Stones (V) can be also found here, on easily-accessible pedestals. The last room contains the Boss-level Necromancer (A), the Boss Chest (B), ten Welkynd Stones, a full set of Novice Apparatus and two Soul Gems.
Occupants:
- 1 boss-level Necromancer at location A on map
- 2 Necromancers (non-respawning)
Treasure:
- 1 boss-level Ayleid Coffer (Necromancer variety) at location B on map
- 2 Varla Stones at V
- 2 Ayleid Casks 01 (1 locked)
- 22 Welkynd Stones. 8 are in the first room on their pedestals; 4 can be found in the second room (they are likely to have fallen and will be near the pedestals); and 10 in the center area of the boss room (three in the unlit brazier, one on the floor, one on the altar, and five in pedestals).
- The following alchemy equipment will always be found: 1 Novice Alembic, 1 Novice Calcinator, 1 Novice Mortar & Pestle, and 1 Novice Retort
- The other following items will always be found: 1 empty lesser soul gem and 1 empty petty soul gem
- Some of the above items are clustered at the following locations:
- At G: 2 Welkynd Stones, 1 empty lesser soul gem, and 1 empty petty soul gem
- At H: 1 Novice Alembic, 1 Novice Calcinator, 1 Novice Mortar & Pestle, 1 Novice Retort, and 1 Welkynd Stone
Doors and Gates:
- There are two doors in/out of this zone
- 1 door (at D) leads to the zone Wendelbek
- 1 door (at F) leads to the zone Wendelbek Sel Aran Mathmedli
- 1 Iron Gate (opened remotely) at I
Other:
- 1 Stone Steps (rise to form steps when activated) at location J on map
