Oblivion:The Temple Sewers
|
||
|---|---|---|
| # of Zones | 2 | |
| Occupants | ||
| Goblin Enemies | ||
| Important Treasure | ||
| 1 boss-level Chest 02 | ||
| Console Location Code(s) | ||
| ImperialSewerSystemSW, ImperialSewerSystemTempleDistrict | ||
| Location | ||
| The sewer system under the Imperial City Temple District | ||
The Temple Sewers are a medium-sized sewer system under the Imperial City Temple District containing goblins. It contains two zones: The South West Tunnel and The Temple Sewers.
Notes
- This is one of many sections of the sewers under the Imperial City.
- Although this sewer is under the Temple District, there is no sewer entrance directly from the Temple District; it can only be accessed via other sewers or through Amantius Allectus' basement. The closest entrance above ground is the Talos Plaza Sewers.
- The southern door from The South West Tunnel to The Temple Sewers leads to a gate that can only be opened after completely exploring the sewer section accessed through the northern door.
Zone 1: The South West Tunnel
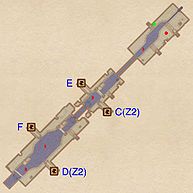
It doesn't make any difference which door you enter this area from (doors E and F on the map). In either case, the only point of interest in the area is the chest in the northeastern room.
Which door you exit this area through, however, is important. If you are proceeding into The Temple Sewers, you should pass through the northern of the two doors (door C on the map), as the majority of this area is initially inaccessible if you pass through the southern door (door D).
If you are returning to the Talos Plaza Sewers, passing through door E provides the shortest path to the surface. See the Talos Plaza Sewers description for more information.
Occupants:
- 1 Nuisance Animal
- 0-4 Mud Crabs
Treasure:
- 1 Chest 02 (locked)
Doors and Gates:
- There are four doors in/out of this zone
- 2 doors (at C and D) lead to the zone The Temple Sewers
- 2 doors (at E and F) lead into the Talos Plaza Sewers
Zone 2: The Temple Sewers
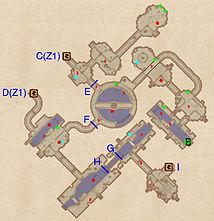
Enter this zone from the northern of the two doors (door C on the map). The gate directly in front of you is opened by the wheel on the right-hand wall. You can explore the two rooms off to the left before opening the gate, but you may attract the attention of enemies in rooms beyond the gate. This will prevent you from picking the locks on the two chests in the northernmost room (but will not prevent you using spells or scrolls to open them). If you do attract the attention of enemies beyond the gate before you have opened it, there is a chance they may start fighting with the slaughterfish in the pool in the large circular room.
Open the gate using the wheel in the first room, and enter the large circular room. If you head left as you enter the room, you will find an unlocked chest containing potions. You should be able to gain easy sneak experience in this room due to the presence of the slaughterfish. If you fall into the water, there is a ramp against the southern wall of the room that you can use to climb out. The rooms to the south will be blocked by a remotely-opened gate, so climb the slope against the eastern wall of the room and pass through the iron gate to access the rooms to the northeast.
You will find yourself on a walkway above a room. You can drop down into the room, but this may result in you being attacked by several enemies at the same time. Instead, cross the walkway and follow the passage into the next room. You will emerge at the top of a staircase, and should be able to take on any enemies one-by-one. Descend the stairs and head into the room to the southwest to reach the boss-level chest in the water, watching out for enemies in the water.
Head into the room to the northwest (the one with the walkway) and deal with the enemy within (if you haven't already). There is a wheel in this room that opens the gate in the large circular room, allowing access to the southern section of the area. There is also a chest against the northern wall for you to loot. There is another chest in the adjacent room, behind the stairway.
Return to the large circular room, and pass through the newly-opened gate. After dealing with the enemies in the next room, and looting the chest against the north wall, activate the wheel against the southeast wall. This opens the sluice gate in the next room, and allows access to the final area. You can then proceed through the remaining rooms, ending your sewer crawl in the room containing the door to Amantius Allectus' basement (door I on the map). Unfortunately, there is nothing of any real interest in these final rooms, aside from whatever you can loot from the bodies of any enemies you encounter.
Occupants:
- 3-13 Goblin Enemies (each 80% probability Goblin, 13% Rat, 7% Mud Crab)
- 2-5 Mud Crabs
- 1-2 Slaughterfish
Treasure:
- 1 boss-level Chest 02 (Goblin variety) at location B on map
- 3 Chests 01 (1 locked)
- 2 Chests 02 (both locked)
- 2 Chests 04
- The following ingredients will always be found: 4 Lettuces
Doors and Gates:
- There are three doors in/out of this zone
- 2 doors (at C and D) lead to the zone The South West Tunnel
- 1 door (at I) leads out of the sewers to Amantius Allectus' Basement
- 2 sewer Gates at E and F
- 2 Slough Gates at G and H


