Oblivion:Fathis Aren's Tower
|
|||
|---|---|---|---|
| # of Zones | 3 | ||
| Occupants | |||
| Fathis Aren, Conjurers, Daedra, Dremora, Giant Slaughterfish, Animals, (1 boss-level Conjurer, 1 boss-level Dremora) |
|||
| Important Treasure | |||
| Key-Shaped Arrowhead, Fathis Aren's Chest 1 boss-level Chest, 1 Nirnroot |
|||
| Console Location Code(s) | |||
| TempleOfTheEmperorZeroExterior, BravilWizardsGrotto, BravilWizardsLair, TGTempleOfTheEmperorZero | |||
| Region | |||
| Nibenay Valley | |||
| Location | |||
| South of Bravil | |||
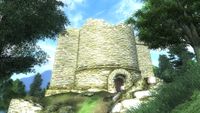
Fathis Aren's Tower is a medium-sized fort south of Bravil containing conjurers, daedra, and dremora (quest-related). It contains three zones: Bravil Wizard's Grotto, Bravil Wizard's Lair, and Fathis Aren's Tower.
Related Quests
- Arrow of Extrication: Steal an arrow for the Gray Fox.
Notes
- The doors to enter the tower from the outside are locked (key required), even after you start the associated quest.
- You gain access to the tower through the Bravil Wizard's Grotto, which can be entered either from Castle Bravil or from a trapdoor at the bottom of Niben Bay.
- The Wizard's Grotto and Lair, and the tower itself can all be entered and fully explored without starting the related quest.
- For easier exploration, pickpocket the strange key from Fathis Aren prior to the quest.
- The music for the Wizard's Grotto and Wizard's Lair maps is the "public" type, rather than the more logical "dungeon".
Exterior
- The exterior is located at coordinates: Tamriel 16, -14
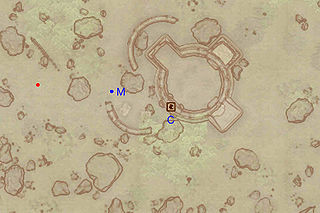
- This location's map marker (M on map) is named Fathis Aren's Tower (editor name TempleoftheEmperorZeroMapMarker). The entrance door is ESE of the marker, 80 feet away.
- 1 Wilderness Creature (Valley variety) is near the entrance
- The following plants can be found near the entrance: 33 Bergamot plants, 8 Mandrake plants, and 7 Nightshade plants
Zone 1: Bravil Wizard's Grotto
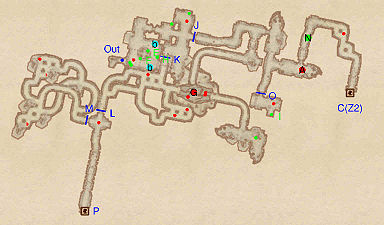
This zone is basically a large labyrinth and the secret experiments performed by castle wizard Fathis Aren and his conjurer allies make the area both uncomfortable and very dangerous. A healthy amount of lockpicks as well as water breathing abilities are essential for a successful exploration. Unless you managed to locate the secret entrance (Out) in the middle of the Niben Bay you will arrive from Castle Bravil through door P and will immediately be faced with the unusual sight of a Dremora guarding the first intersection. Ignore the gate to your left (M) as it only leads to a bare bones underground maze and pick the lock on the gate at L. Both tunnels ahead leads to the same chamber, with knee-deep water and several paths to choose from; if you are just here to complete the quest, take the southern or western path and skip the next section. Otherwise, locate the old wooden door at K and pick the lock.
The door reveals an entire subsection inhabited by conjurers and lots of options. The dead end to the south contains several piles of bones and a common soul gem. A conjurer will most likely detect and attack you, so be prepared. Proceed north and note that the wooden door at J says ‘key required’, which can be opened after the acquisition of Aren's Strange Key, which Fathis Aren carries. The northern chamber contains a minor loot chest and a poisoned apple, while the chamber opposite the locked door gives access to the rest of the conjurer lair, a large room filled to the brink with treasure, potions and rare ingredients (all scattered at E, F, and H), along with alchemic equipment and two bedrolls at b. Pick up what you need and backtrack all the way to watery room south of the wooden door at K then head east until the knee-deep water turns into a very deep, flooded pit.
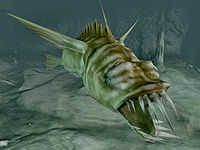
Check your water breathing abilities and prepare for a long dive. The pit is inhabited by a few slaughterfish and is incredibly deep. On your way down, look at your map and note the underwater path leading north; this is the path circumventing the locked door at J and the only way to proceed in the dungeon. Ignore it for now, and dive even deeper into the pit until you see a hole at the bottom; this is the lair of the unique Giant Slaughterfish (G), so prepare yourself for an underwater boss battle. Make sure to loot the dead fish for a huge amount of valuables then swim west towards a tunnel where you will find door Out, the secret entrance from Niben Bay. Backtrack to the tunnel leading north and swim until you finally surface near an alcove with some lower level equipment. At the next intersection, ignore the left path as it leads to the other side of door J and head right. As you approach the last intersection you will most likely be detected by the boss-leveled Dremora at A, so dispose of him and consider picking the lock at door O, even if it will only net you another fight against a leveled Daedra, a restoration chest and some alchemic equipment (all at I). Finally, pick the Nirnroot at N and make your way to the locked door at C, the entrance to Bravil Wizard's Lair.
Occupants:
- 1 boss-level Dremora at location A on map
- 1 Giant Slaughterfish (see link for details on loot carried by slaughterfish; non-respawning) at G
- 1 Conjurer
- 2 Conjurer Enemies (each 50% probability Conjurer, 50% Daedra)
- 1 Dremora
- 2-4 Nuisance Animals
- 3 Mud Crabs
- 3 Slaughterfish
Treasure:
- 1 Nirnroot at location N on map
- 1 Barrel with rare ingredients
- 2 Chests 01 (1 locked)
- 2 Chests 03 (1 locked)
- 2 Chests 04
- The following alchemy equipment will always be found: 2 Novice Alembics, 3 Novice Calcinators, 3 Novice Mortar & Pestles, and 2 Novice Retorts
- The following ingredients will always be found: 1 Cairn Bolete Cap, 1 Poisoned Apple, 1 Dragon's Tongue, 3 Flax Seeds, 1 Ogre's Teeth, 3 Taproots, 1 Venison, and 1 Void Salts
- The following potions will always be found: 1 Poison of Sickness, 1 Potion of Feather, and 1 Potion of the Sea
- The other following items will always be found: 1 common soul gem with petty soul, 1 Steel Helmet, 1 Steel Shield, 1 Absorb Skill: Illusion scroll, 1 Fine Steel Longsword, and 1 Steel Dagger
- Some of the above items are clustered at the following locations:
- At E: 1 Chest 01 (locked), 3 Flax Seeds, 3 Taproots, 1 Venison, and 1 Void Salts
- At F: 1 Cairn Bolete Cap, 1 Dragon's Tongue, 1 Novice Calcinator, 1 Novice Mortar & Pestle, 1 Novice Retort, and 1 Ogre's Teeth
- At H: 1 Absorb Skill: Illusion scroll, 1 Poison of Sickness, 1 Potion of Feather, and 1 Potion of the Sea
- At I: 1 Chest 04, 1 Novice Alembic, 1 Novice Calcinator, and 1 Novice Mortar & Pestle
Doors and Gates:
- There are three doors in/out of this zone
- 1 door (at Out) is deep underwater and leads outside, to a trapdoor at the bottom of Niben Bay (map)
- 1 door (at C) leads to the zone Bravil Wizard's Lair (locked, opened by Aren's Strange Key)
- 1 door (at P) leads out of dungeon to Lord's Manor North Wing, Castle Bravil (locked, opened by Aren's Strange Key)
- 2 Gates at L and M (both locked, L opened by Aren's Strange Key)
- 3 Old Wooden Doors at J, K, and O (all locked, J says 'key required' but there is no key)
Other:
- 2 bedrolls at locations b on map
Zone 2: Bravil Wizard's Lair
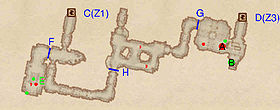
Compared to the overly complex Wizard's Grotto, the lair is linear and easy to navigate, provided you have plenty of lockpicks. Upon arriving from door C, decide whether or not you will pick the lock on the wooden door at F, as it will only net you a minor loot chest, some alchemic equipment (E) and a fight against one or two conjurer enemies. Follow the tunnel towards the gate at H and pick the lock. A few enemies may spawn behind the door, so dispose of them and make your way to gate G and pull out your lockpick once again. The door hides two Conjurer enemies, one of them boss-leveled (A) and the boss chest at B. After the fight, loot all chests and find the last locked door at D; this will lead you outside, to the exterior and initially inaccessible Fathis Aren's Tower.
Occupants:
- 1 boss-level Conjurer at location A on map
- 2-5 Conjurer Enemies (each 50% probability Conjurer, 50% Daedra)
Treasure:
- 1 boss-level Chest (Conjurer variety; locked) at location B on map
- 1 Chest 01
- 1 Chest 04 (locked)
- The following alchemy equipment will always be found: 1 Novice Alembic, 1 Novice Calcinator, 1 Novice Mortar & Pestle, and 1 Novice Retort
- The following weapons will always be found: 1 Steel Dagger
- Some of the above items are clustered at location E: 1 Novice Alembic, 1 Novice Calcinator, 1 Novice Mortar & Pestle, and 1 Novice Retort
Doors and Gates:
- There are two doors in/out of this zone
- 1 door (at C) leads to the zone Bravil Wizard's Grotto (locked, opened by Aren's Strange Key)
- 1 door (at D) leads out of dungeon to Fathis Aren's Tower (locked, opened by Aren's Strange Key)
- 2 Gates at G and H (both locked, opened by Aren's Strange Key)
- 1 Old Wooden Door at F (locked)
Zone 3: Fathis Aren's Tower
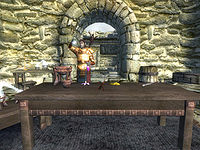
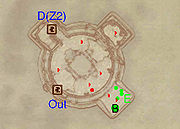
The final zone is the Tower itself, and if you are on the related quest you will have to climb it and claim the Key-Shaped Arrowhead for the Gray Fox. You will arrive from the Wizard's Lair through door D, and the giant door at Out can only be unlocked using Aren's Tower Key, which is located near the arrow, so start climbing. The amount of enemies is randomly determined, but you will most likely encounter several Daedra enemies. The first floor contains a few minor loot chests in an alcove while the third floor hides a wilderness chest behind some barrels. The floor in-between is where Fathis Aren himself conducts his conjuration experiments (E). You are to claim both the arrowhead and the tower key from his chest at B, which can be quite risky (see this section for strategies). When all is said and done, use the key to unlock door Out, leading to a much more peaceful outside world.
Occupants:
- 0-2 Conjurer Enemies (each 50% probability Conjurer, 50% Daedra)
- 0-5 Daedra
- 1 Daedra (always best possible level)
Treasure:
- Fathis Aren's Chest (contents: 50% chance enchanted armor, 50% enchanted weapon, 25% scroll, 75% 2 empty soul gems, 75% 3 filled soul gems, Aren's Tower Key; non-respawning) at location B on map
- 2 Chests 01 (1 locked)
- 1 Chest 02 (locked)
- The following alchemy equipment will always be found: 1 Apprentice Alembic, 1 Apprentice Calcinator, 1 Apprentice Mortar & Pestle, 1 Apprentice Retort, and 1 Novice Alembic
- The following ingredients will always be found: 1 Bloodgrass, 1 Imp Gall, and 1 Nightshade
- The other following items will always be found: 1 Dwemer History and Culture and 1 Silver Dagger
- Some of the above items are clustered at location E: 1 Apprentice Alembic, 1 Apprentice Calcinator, 1 Apprentice Mortar & Pestle, 1 Apprentice Retort, 1 Bloodgrass, 1 Imp Gall, 1 Nightshade, and 1 Silver Dagger
Doors and Gates:
- There are two doors in/out of this zone
- 1 door (at Out) leads outside (locked, key required, opened by Aren's Tower Key)
- 1 door (at D) leads to the zone Bravil Wizard's Lair
