Oblivion:Atatar
|
|||
|---|---|---|---|
| # of Zones | 4 | ||
| Occupants | |||
| Bandits, Azani Blackheart | |||
| Important Treasure | |||
| 1 boss-level Chest 02 | |||
| Console Location Code(s) | |||
| AtatarExterior, Atatar, Atatar02, Atatar03, Atatar04 | |||
| Region | |||
| Blackwood | |||
| Location | |||
| Northeast of Leyawiin, just northwest of Drunken Dragon Inn | |||
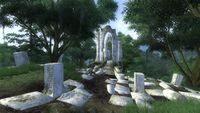
Atatar is a large Ayleid ruin between Bravil and Leyawiin containing bandits (quest-related). It contains four zones: Atatar, Atatar Haelia Dagon, Atatar Haelia Anga, and Atatar Loria.
Related Quests
- Azani Blackheart: Help Modryn prove that the Blackwood Company lied about completing a contract to kill Azani Blackheart.
Notes
- This cave can be entered, fully explored and all items retrieved without starting the related quest. In this case, however, Azani Blackheart won't appear in the final zone, Atatar Loria.
Exterior
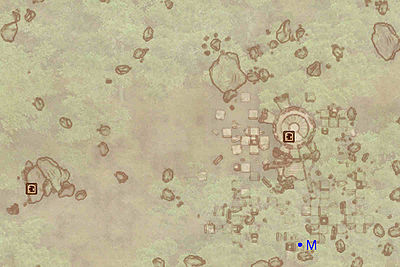
- The exterior is located at coordinates: Tamriel 30, -21
- This location's map marker (M on map) is named Atatar (editor name AtatarMapMarker). The entrance door is N of the marker, 110 feet away.
- The following plants can be found near the entrance: 8 Clouded Funnel Cap plants
Zone 1: Atatar
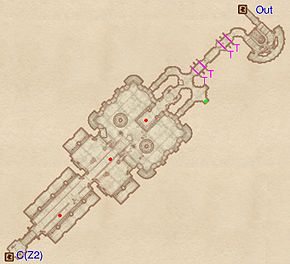
This is the first zone of Atatar and also the most straightforward. Upon entering, a grim scene will welcome you: three dead rats lay in pools of blood next to two sets of Swinging Blade traps (T). Taking care so you don't end up like them, you will eventually arrive at a three-way junction. Heading straight leads you to a small balcony with one enemy, while left or right take you to a lower level of the same room. The first route is the best, since you can easily snipe at the second enemy present on the other side of the room. Proceed to C to access Atatar Haelia Dagon.
Occupants:
- 1 archer Bandit
- 2 melee Bandits
Treasure:
- 1 Chest 01 (locked)
Traps:
- 4 Swinging Blade traps at locations T on map
Doors and Gates:
- There are two doors in/out of this zone
- 1 door (at Out) leads outside
- 1 door (at C) leads to the zone Atatar Haelia Dagon
Zone 2: Atatar Haelia Dagon
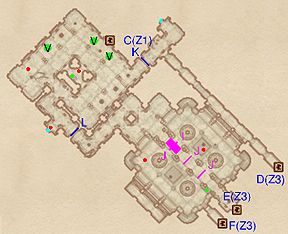
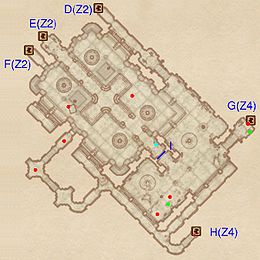
You enter this zone from Atatar through door C and can access the third zone, Atatar Haelia Anga, by using doors E and F. Door D can only be used when coming back to this zone, since the gate at K, which is opened from the other side, will prevent you from reaching it.
In the first room you enter are a good deal of Varla cages, both open and sealed. One of the open ones holds the ruin's only Welkynd Stone. The closed cages are activated by pressing the push-block in the northeastern passage, which you can only access from door D, which in turn can only be accessed from the next zone 'Atatar Haelia Anga'. Once you have opened them, you can retrieve three Varla Stones.
The final room is quite large and is on two levels; you will find yourself on the highest. The bridge that leads to door E is heavily trapped: if you manage not to fall when the it crumbles (I), you will still have to face two Falling Blade traps (J) before reaching the door. If you do fall, you will face two nuisance animals, have access to a minor loot chest and may enter the third zone through door F.
Jumping up from the lower level onto the bridge will require a very high Acrobatics, preferably over 100. It is recommended you enter the next level through door E, since you will find yourself on a higher level than if you enter from door F.
Occupants:
- 3 melee Bandits
- 2 Nuisance Animals
Treasure:
- 3 Varla Stones (all in Varla Stone Cages) at locations V on map
- 1 Chest 01 (locked)
- 1 Chest 02
- 1 Welkynd Stone, in the first room you enter, on an easily-reachable pedestal
Traps:
- 1 Crumbling Bridge trap at location I on map
- 3 Falling Blade traps at J
Doors and Gates:
- There are four doors in/out of this zone
- 1 door (at C) leads to the zone Atatar
- 3 doors (at D, E, and F) lead to the zone Atatar Haelia Anga
- 2 Iron Gates (opened remotely) at K and L
Zone 3: Atatar Haelia Anga
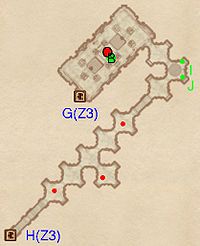
You will enter this zone from Atatar Haelia Dagon from either door E or F, depending on which one you used in the previous level. Door D also leads to Haelia Dagon, and will give you access to the previously unreachable section of that zone. Both doors G and H lead to the final zone; Atatar Loria, although obviously to different locations.
If you follow the recommended path, and stayed on the bridge, you will find yourself on another bridge. After following the bridge and opening the gate at I by using the push-block in front of it (cyan dot on map) you can head to door D or door G. If you fell down, you will be on a lower level of the same room. After a flight of stairs, you will arrive at a balcony corridor overlooking a room. Jumping down will lead you to the previously mentioned doors, while continuing straight will bring you to door H.
If the related quest is active, use door H to access the last zone, as it will give you a chance to sneak up on Azani. Otherwise, use door G to have quick access to the boss chest.
Occupants:
- 2 Bandit Hedge Wizards
- 1 melee Bandit
- 4-5 Nuisance Animals
Treasure:
Doors and Gates:
- There are five doors in/out of this zone
- 3 doors (at D, E, and F) lead to the zone Atatar Haelia Dagon
- 2 doors (at G and H) lead to the zone Atatar Loria
- 1 Iron Gate (opened remotely) at I
Zone 4: Atatar Loria
This is the fourth and final zone of the ruin. If you come through door G and if the related quest is active, Azani Blackheart (Q) will most likely detect you; refer to the quest page for more info.
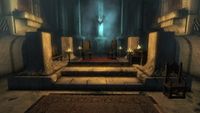
If you don't have the quest active, you will find a well-lit room with a carpet, some benches and chairs and a boss chest (B), unguarded. Heading left will reveal another, smaller room with two bookshelves, containing some rare books, a jewelry box and a chest; at I and J. If you entered from door H, after wading in knee-deep water, you will find yourself in this second room.
Occupants:
- Azani Blackheart at location Q on map
- 3 Nuisance Animals
Treasure:
- 1 boss-level Chest 02 (Bandit variety; locked) at location B on map
- 1 Chest 01
- 1 Jewelry Box (contains 50% chance jewelry, 50% silver nugget, gold change; non-respawning)
- The following books will always be found: 2 Hanging Gardens, 1 Magic from the Sky, 1 Mystery of Talara, 5, 1 On Morrowind, 1 On Oblivion, 1 Palla, volume 2, 1 The Last King of the Ayleids, 1 The Madness of Pelagius, 2 The Real Barenziah, v 1, 1 The Real Barenziah, v 4, 1 The Third Door, and 1 The Wolf Queen, v 8
- The other following items will always be found: 1 Ruby
- Some of the above items are clustered at the following locations:
- At I: 2 Hanging Gardens, 1 Jewelry Box (contains 50% chance jewelry, 50% silver nugget, gold change; non-respawning), 1 Magic from the Sky, 1 Mystery of Talara, v 5, 1 On Oblivion, 1 Palla, volume 2, 1 The Last King of the Ayleids, and 1 The Third Door
- At J: 1 Chest 01, 1 Ruby, 1 The Madness of Pelagius, and 1 The Wolf Queen, v 8
Doors and Gates:
- There are two doors (at G and H) in/out of this zone, both leading to the zone Atatar Haelia Anga
