Shivering:Blackroot Lair
|
|||
|---|---|---|---|
| # of Zones | 5 | ||
| Occupants | |||
| Grummites, Gnarl Prisoners (2 boss-level Grummites) |
|||
| Important Treasure | |||
| 2 boss-level Chests 3 Hollowed Amber Limbs 1 Hollowed Amber Stump |
|||
| Console Location Code(s) | |||
| XPBlackrootLairExterior, XPBlackrootLair01, XPBlackrootLair02, XPBlackrootLair03, XPBlackrootLair04, XPBlackrootLair05 | |||
| Region | |||
| Dementia | |||
| Location | |||
| East of The Fringe, along The Low Road | |||
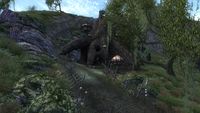
Blackroot Lair is a large root cave east of The Fringe containing Grummites. It contains five zones: Blackroot Lair, Blackroot Lair, Outer Encampment, Blackroot Lair, Channel, Blackroot Lair, Inner Encampment, and Blackroot Lair, Tunnels.
Notes
- The Grummite encampments often contain average-level locked cages with imprisoned Gnarls inside. If released, these Gnarls will ignore you, but hunt down their Grummite captors. There are also several areas where you will find Gnarls that have already escaped.
- This cave contains 2 Rot Scale plants, 12 Thorn Hook plants, 41 Root Stalk plants, and 113 Withering Moon plants.
Exterior
- The exterior is located at coordinates: SEWorld -5, -2
- This location's map marker (M on map) is named Blackroot Lair. The entrance door is NW of the marker, 80 feet away
- 1 Zealot is near the entrance
- 1 Grummite (Dementia) is near the entrance
- 1 archer Grummite (Dementia, always best possible level) is near the entrance
- The following ingredients can be found near the entrance: 1 Black Tar and 2 Grummite Eggss
- The following plants can be found near the entrance: 2 Black Tar plants, 2 Blister Pod plants, 3 Putrid Gigantea plants, 2 Fungus Stalk plants, 3 Swamp Tentacle plants, and 14 Mushroom Tree Sapling plants
Zone 1: Blackroot Lair
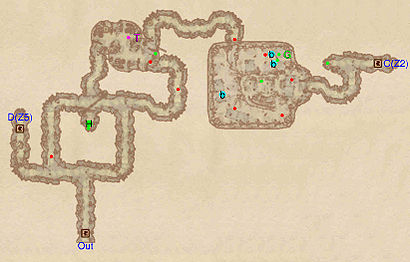
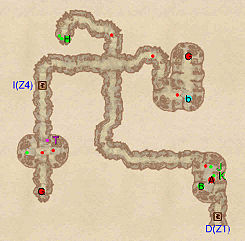
Upon entering, two palisades begin a treacherous root tunnel fortified and inhabited by what appear to be Gnarl-breeding Grummites. At the first intersection, head right: although both tunnels lead to the same spot, you should avoid an enemy this way. At the next intersection, loot the amber limb in the alcove to the south (H) and use the westernmost tunnel to hopefully avoid another fight.
Dodge the spore pod trap at T and head to the final room. A large encampment on two levels, with the central part on a higher level, sprawls out before you. Take advantage of your elevated position to snipe at the Grummite on the wooden construction to the southwest before taking out the two Grummites below. 6 samples of Gnarl bark are laid out at G.
When you return from the final zone, Blackroot Lair, Tunnels, you will be able to used door D, which is on a higher level than the rest of the zone, for a quick exit.
Occupants:
- 1 Grummite (Dementia; group list)
- 3 Grummites (Dementia, always best possible level)
- 1 Grummite (Dementia; group list; non-respawning)
- 1 archer Grummite (Dementia, always best possible level)
- 1 archer Grummite (Dementia; group list, always best possible level; non-respawning)
- 1 archer Grummite (Dementia, always best possible level; non-respawning)
Treasure:
- 1 Hollowed Amber Limb (1-4 Amber; non-respawning) at location H on map
- 3 Chests (1 locked)
- 2 Hollowed Stumps (Healing)
- The following ingredients will always be found: 6 Gnarl Barks
- The following plants will always be found: 2 Rot Scale plants, 4 Thorn Hook plants, 16 Root Stalk plants, and 32 Withering Moon plants
- Some of the above items are clustered at location G: 6 Gnarl Barks
Traps:
- 1 Spore Pod trap at location T on map
Doors and Gates:
- There are three doors in/out of this zone
- 1 door (at Out) leads outside
- 1 door (at C) leads to the zone Blackroot Lair, Outer Encampment
- 1 door (at D) leads to the zone Blackroot Lair, Tunnels
Other:
- 3 bedrolls at locations b on map
Zone 2: Blackroot Lair, Outer Encampment
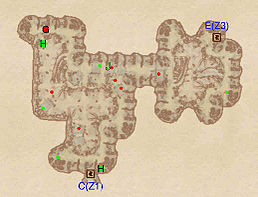
This zone is essentially one big encampment full of Grummites, which frequently gang up on you, making for a tough fight. You enter on a lower level and you will almost immediately alert the enemies on the upper level. Try to take out those nearby quickly to avoid a fight with up to 6 enemies. Freeing the Gnarl from its cage in the northwest corner (G) will let it assist you in combat. Once you're done, loot the amber veins at H and the Gnarl bark samples at J before heading to door E.
Occupants:
- 2 Grummites (Dementia, always best possible level)
- 3 Grummites (Dementia; group list; non-respawning)
- 1 archer Grummite (Dementia; group list, always best possible level; non-respawning)
- 1 Gnarl Prisoner (always best possible level; non-respawning) at location G on map
Treasure:
- 1 Hollowed Amber Limb (1-4 Amber; non-respawning) at location H on map
- 1 Hollowed Amber Stump (1-4 Amber; non-respawning) at H
- 1 Chest
- 1 Chest (Healing)
- 2 Hollowed Stumps (Healing)
- The following ingredients will always be found: 3 Gnarl Barks
- The following plants will always be found: 2 Root Stalk plants and 2 Withering Moon plants
- Some of the above items are clustered at location J: 1 Chest and 3 Gnarl Barks
Doors and Gates:
- There are two doors in/out of this zone
- 1 door (at C) leads to the zone Blackroot Lair
- 1 door (at E) leads to the zone Blackroot Lair, Channel
Zone 3: Blackroot Lair, Channel
Another, smaller, encampment awaits you as soon as you enter from door E. Although you are on the lower level, so is one of the two enemies nearby, so the fight shouldn't be as challenging. Loot all three of the hollowed stumps in the room and head south at the next intersection to free another Gnarl (G). When you arrive in the final room, locate the tunnel heading west and liberate another Gnarl (G), who will help you against the two enemies guarding door F to Blackroot Lair, Inner Encampment.
Occupants:
- 4 Grummites (Dementia; group list; non-respawning)
- 1 archer Grummite (Dementia, always best possible level)
- 2 Gnarl Prisoners (always best possible level; non-respawning) at locations G on map
Treasure:
- 2 Chests (1 locked)
- 1 Hollowed Stump
- 1 Hollowed Stump (Healing)
- The following plants will always be found: 7 Thorn Hook plants, 8 Root Stalk plants, and 45 Withering Moon plants
Doors and Gates:
- There are two doors in/out of this zone
- 1 door (at E) leads to the zone Blackroot Lair, Outer Encampment
- 1 door (at F) leads to the zone Blackroot Lair, Inner Encampment
Zone 4: Blackroot Lair, Inner Encampment
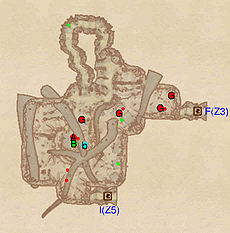
Like the second zone, this one is made up of one large room filled with encamped Grummites. You will enter on the lower level and immediately face a Grummite, once you've dispatched it, open the two nearby cages, thereby freeing the two Gnarls (G) to help in the fight. In the wooden construction in front of you, a Grummite and a Gnarl (G) are fighting, so wait out the winner and eventually help the Gnarl. The same is happening on the upper level in the center, where a Gnarl (G) is fighting two Grummites, one of which boss-level (A).
By now, all the remaining Grummites should be alerted to your presence, so brace yourself for a fight. When all is done, climb up to the central area and loot the boss chest at B before entering any of the two tunnels leading north to loot a hollowed stump. Jump back down and head for door I, taking care to loot the chest stuck under the wooden construction.
Occupants:
- 1 boss-level Grummite (Dementia; non-respawning) at location A on map
- 4 Grummites (Dementia; group list; non-respawning)
- 1 archer Grummite (Dementia; group list, always best possible level; non-respawning)
- 4 Gnarl Prisoners (always best possible level; non-respawning) at G
Treasure:
- 1 boss-level Chest (Grummite variety) at location B on map
- 1 Chest
- 1 Chest (Healing)
- 1 Hollowed Stump (Healing)
- The following ingredients will always be found: 6 Gnarl Barks
- The following plants will always be found: 1 Thorn Hook plant, 7 Root Stalk plants, and 18 Withering Moon plants
- Some of the above items are clustered at location B: 3 Gnarl Barks and 1 boss-level Chest (Grummite variety)
Doors and Gates:
- There are two doors in/out of this zone
- 1 door (at F) leads to the zone Blackroot Lair, Channel
- 1 door (at I) leads to the zone Blackroot Lair, Tunnels
Other:
- 1 bedroll at location b on map
Zone 5: Blackroot Lair, Tunnels
Upon entering from door I, head south, brave a spore pod trap and two Grummites, and free a Gnarl (G) from its cage. Backtrack north, and at the next three-way junction, head left to loot two hollowed stumps and an amber limb (H). Return to the intersection and go straight ahead to free yet another Gnarl (G). Finally, head south until you arrive in the final room, where a boss-level Grummite (A) guards a boss chest (B), 6 samples of Gnarl bark and 2 madness ores (J and K). Head out through door D for a quick exit.
Occupants:
- 1 boss-level Grummite (Dementia; non-respawning) at location A on map
- 3 Grummites (Dementia, always best possible level)
- 2 Grummites (Dementia; group list; non-respawning)
- 1 archer Grummite (Dementia, always best possible level)
- 2 Gnarl Prisoners (always best possible level; non-respawning) at G
Treasure:
- 1 boss-level Chest (Grummite variety) at location B on map
- 1 Hollowed Amber Limb (1-4 Amber; non-respawning) at H
- 1 Chest
- 2 Hollowed Stumps (Healing)
- The other following items will always be found: 2 Madness Ores and 6 Gnarl Barks
- The following plants will always be found: 8 Root Stalk plants and 16 Withering Moon plants
- Some of the above items are clustered at the following locations:
- At J: 3 Gnarl Barks and 1 Madness Ore
- At K: 3 Gnarl Barks and 1 Madness Ore
Traps:
- 1 Spore Pod trap at location T on map
Doors and Gates:
- There are two doors in/out of this zone
- 1 door (at D) leads to the zone Blackroot Lair
- 1 door (at I) leads to the zone Blackroot Lair, Inner Encampment
Other:
- 1 bedroll at location b on map
