Oblivion:Shinbone Cave
|
|||
|---|---|---|---|
| # of Zones | 2 | ||
| Occupants | |||
| Goblins | |||
| Console Location Code(s) | |||
| ShinboneCaveExterior, ShinboneCave, ShinboneCave02 | |||
| Region | |||
| Heartlands | |||
| Location | |||
| East bank of the Upper Niben, South of the Red Ring Road | |||
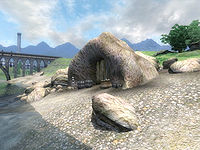
Shinbone Cave is a medium-sized cave southeast of the Imperial City containing goblins. It contains two zones: Shinbone Cave and Shinbone Galleries.
Notes
- This cave contains 53 Cairn Bolete plants and 31 Wisp Stalk plants.
Exterior
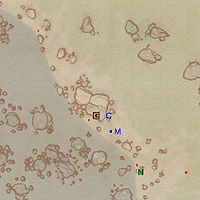
- The exterior is located at coordinates: Tamriel 15, 5
- This location's map marker (M on map) is named Shinbone Cave (editor name ShinboneCaveMapMarker). The entrance door is NW of the marker, 40 feet away.
- 0-1 Goblin is near the entrance
- 0-2 Mud Crabs are near the entrance
- 1 Wilderness Creature (Farmlands variety) is near the entrance
- 1 Nirnroot is at location N on map
Zone 1: Shinbone Cave
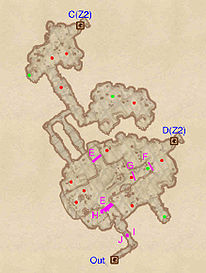
Shinbone Cave contains a fair amount of goblin resistance but also a decent amount of treasure. Shortly after entering, watch out for the Pressure Plate at I that activates a Swinging Mace trap (J). After passing this, you will find yourself in a large room with plenty of opposition. Head to the right end of this room to loot a minor loot chest; watch out for the Tripwire trap at G that will cause some painful Falling Logs at F to roll down from above. Head through the tunnel at the north part of the room and turn left at the intersection to reach the upper level of the large room. Proceed through this room in a clockwise fashion until you reach the minor loot chest in the southeastern tunnel; take care when crossing the Rotten Plank at E. Do not bother heading across the second set of Rotten Planks at E to reach the southwest corner of the room, as the only reward you will get is to be hit by a Swinging Log (H) activated by a Pressure Plate at I. It is advisable to now go through door D and loot this section of Shinbone Galleries, otherwise you will have to backtrack to this door at a later time. After doing this, proceed back across the Rotten Planks, this time heading straight at the intersection and then making a right turn to enter a chamber with one foe and a minor loot chest. After taking care of this, proceed north and take care of the opposition and unlock a chest containing minor loot. Afterwards, locate door C and enter Shinbone Galleries.
Occupants:
- 7 Goblin Enemies (each 80% probability Goblin, 13% Rat, 7% Mud Crab)
- 4 Nuisance Animals
Treasure:
- 2 Chests 01 (1 locked)
- 1 Chest 02
- 1 Chest 03
- The following weapons will always be found: 1 Steel Dagger
- The following plants will always be found: 24 Cairn Bolete plants and 29 Wisp Stalk plants
Traps:
- 1 Falling Log trap at location F on map
- 2 Pressure Plate triggers at I
- 3 Rotten Plank traps at E
- 1 Swinging Log trap at H
- 1 Swinging Mace trap at J
- 1 Tripwire trigger at G
Doors and Gates:
- There are three doors in/out of this zone
- 1 door (at Out) leads outside
- 2 doors (at C and D) lead out of dungeon to Shinbone Galleries and Shinbone Galleries
Zone 2: Shinbone Galleries
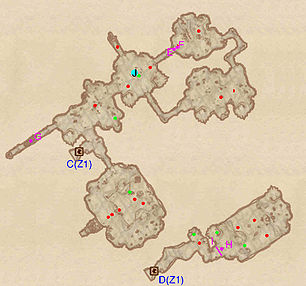
This zone's two entrances access two unconnected areas. If entering from door D, you will find yourself in a relatively simple path with a couple chests to loot. Shortly after entering, grab the potions from the chest on the left, then continue on but watch out for the Tripwire at I that activates a Swinging Log trap (H). You will now find yourself in a room filled with a couple Nuisance Animals and two chests containing minor loot; one on the top level just to the left of the traps, the other a locked chest in the southeast corner of the bottom level of the room. Make your way back to door D to enter Shinbone Cave.
Entering from door C will bring you to a more complicated area, but is still fairly linear. You will be greeted by an intersection; head right to bring yourself to a large room containing a rat farm, a Goblin Rat Farmer, some opposition, and most importantly, a locked chest containing some minor loot. After visiting the farm, backtrack to the intersection at the beginning of the zone and head the opposite way to enter a new room; loot the minor loot chest in the right part of the room and ignore the path to the left as it only leads to a Cave In at G. Proceed forward and enter a chamber with a Dead Captive in a locked cage at J; check his body as he may have some enchanted jewelry that he will not need anymore. After looting a minor loot chest right beside the cage, you could leave as the three remaining paths lead to no treasure. If you enjoy goblin hunting however, going left and straight will give you a few more foes to kill; take care when heading straight for the Pressure Plate at E that activates a Swinging Mace trap (F). You could also head right and try the Goblin Chef's roasted rat cuisine that he is preparing in that room. When you are finished exploring, backtrack to door C to enter Shinbone Cave.
Occupants:
- 1 Goblin Chef (non-respawning)
- 1 Goblin Rat Farmer (non-respawning)
- 5-7 Goblin Enemies (each 80% probability Goblin, 13% Rat, 7% Mud Crab)
- 6 Nuisance Animals
- 2 Rats
Treasure:
- 2 Chests 01 (1 locked)
- 3 Chests 02 (1 locked)
- 1 Chest 04
- The following plants will always be found: 29 Cairn Bolete plants and 2 Wisp Stalk plants
Traps:
- 1 Cave In trap at location G on map
- 1 Pressure Plate trigger at F
- 1 Swinging Log trap at H
- 1 Swinging Mace trap at E
- 1 Tripwire trigger at I
Doors and Gates:
- There are two doors (at C and D) in/out of this zone, both leading to the zone Shinbone Cave
Other:
- 1 Dead Captive (10% chance enchanted jewelry) at location J on map


