Oblivion:Lost Boy Cavern
|
|||
|---|---|---|---|
| # of Zones | 4 | ||
| Occupants | |||
| Necromancer Enemies, Undead (Lich Erandur Vangaril) |
|||
| Important Treasure | |||
| 1 boss-level Chest | |||
| Console Location Code(s) | |||
| LostBoyCavernsExterior, LostBoyCaverns, LostBoyCaverns02, LostBoyCaverns03, LostBoyCaverns05 | |||
| Region | |||
| Nibenay Basin | |||
| Location | |||
| Northwest of Lake Canulus | |||
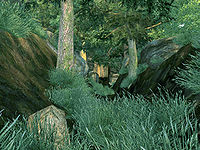
Lost Boy Cavern is a large cave far east of Bravil containing necromancers (quest-related). It contains four zones: Lost Boy Cavern, Lost Boy Canyon, Lost Boy's Yawning Halls, and Lost Boy's Hidden Bastion.
Related Quests
- Lich of Lost Boy Cavern: Follow the story of an exiled mage trying to save his friend from himself (non-journal).
Notes
- This cave contains 11 Cairn Bolete plants and 8 Wisp Stalk plants.
- The last section of this cave has the Editor ID
LostBoyCaverns05, even though there are only 4 zones.LostBoyCaverns04does not exist.
Bugs
- If you are not yet level 23, do not enter the last zone of this cavern, Lost Boy's Hidden Bastion, unless you are willing to never fight Erandur-Vangaril. If you enter the bastion at lower levels, you will be unable to attack or interact in any way with Erandur-Vanagaril — even if you later return at a higher level.
- PC Only This bug is fixed by the Unofficial Oblivion Patch.
Exterior
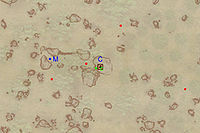
- The exterior is located at coordinates: Tamriel 42, -4
- This location's map marker (M on map) is named Lost Boy Cavern (editor name LostBoyCavernsMapMarker). The entrance door is E of the marker, 100 feet away.
- 2 Wilderness Creatures (Hills variety) are near the entrance
- 2 Wilderness Creatures (Valley variety) are near the entrance
- 1 Weathered Journal is at location c on map
- The following plants can be found near the entrance: 60 Foxglove plants, 29 Green Stain Cup plants, 18 Monkshood plants, and 32 Summer Bolete plants
Zone 1: Lost Boy Cavern
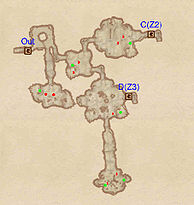
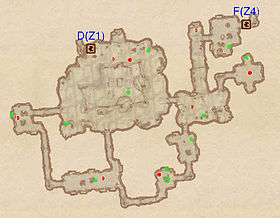
In this level you immediately start at an intersection: right is a small room containing two enemies and a minor loot chest while left is the main part of the current zone. In the next room you will again find yourself at an intersect: right is door D to Lost Boy's Yawning Halls and a corridor, further ahead, leading to a small room with up to two enemies and two minor loot chests. Take left to enter a room with up to two enemies and door C, to Lost Boy Canyon.
Occupants:
- 0-6 Necromancer Enemies (each 50% probability Necromancer, 50% Undead)
- 1 Skeleton Archer
- 1 Undead Enemy (each 83% probability Undead, 17% Rat)
- 0-1 Nuisance Animal
Treasure:
- 3 Chests 01 (1 locked)
- 1 Chest 02
- 2 Chests 03
- The following plants will always be found: 5 Cairn Bolete plants and 5 Wisp Stalk plants
Doors and Gates:
- There are three doors in/out of this zone
- 1 door (at Out) leads outside
- 1 door (at C) leads to the zone Lost Boy Canyon
- 1 door (at D) leads to the zone Lost Boy's Yawning Halls
Zone 2: Lost Boy Canyon
You enter this level through door C and find yourself in the main room of this level. Here you will find the 'canyons' that give the name to this zone. The first and last are two chasms, and you will die if you fall into one. The middle one is a lower part of this zone that can be accessed from Lost Boy's Hidden Bastion. In the central part of this room there is an intersect: left are two rooms containing only enemies and minor loot chests. If you take right, you will wind through a corridor and two small rooms until you will find yourself at the far end of the large room. To continue you will have to fall down the middle canyon (fall damage is minimal) until you arrive at door E to Lost Boy's Hidden Bastion.
Occupants:
- 5-13 Necromancer Enemies (each 50% probability Necromancer, 50% Undead)
Treasure:
- 3 Chests 01 (1 locked)
- 1 Chest 02
- 1 Chest 03
- 1 Chest 04
- 1 Coffin 01
- 1 Crumpled Piece of Paper at location d on map
- The following plants will always be found: 2 Cairn Bolete plants
Doors and Gates:
- There are two doors in/out of this zone
- 1 door (at C) leads to the zone Lost Boy Cavern
- 1 door (at E) leads out of dungeon to Lost Boy's Hidden Bastion
Traps:
- 2 Abysses located in the dark gray areas
Zone 3: Lost Boy's Yawning Halls
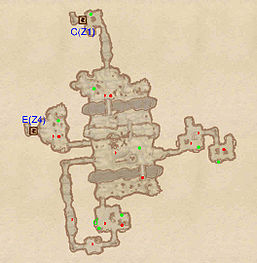
You can enter this zone from both Lost Boy Cavern (door D) and Lost Boy's Hidden Bastion (door F). It is advisable to enter from the latter, as it provides the only way back to the first level. After a long corridor you will find yourself in a room where three corridors depart: to the left is a small room containing an enemy and a minor loot chest, right is the quickest entrance to the largest room in this zone while straight ahead will take you through a series of corridors and rooms until you will find yourself at the opposite end of the large room. This last route is better since you won't miss out on any loot. The large chamber contains two enemies and, on a lower level, the door (D) to Lost Boy Cavern.
Occupants:
- 2-6 Necromancer Enemies (each 50% probability Necromancer, 50% Undead)
- 1-2 Skeleton Archers
Treasure:
- 1 Chest 01
- 2 Chests 02 (1 locked)
- 1 Chest 03
- 2 Chests 03
- 1 Chest 04
- 1 Chest 04
- 1 Coffin 01
- 1 crumpled piece of paper at location e on map
- The following ingredients will always be found: 1 Mort Flesh
- The following plants will always be found: 4 Cairn Bolete plants and 3 Wisp Stalk plants
Doors and Gates:
- There are two doors in/out of this zone
- 1 door (at D) leads to the zone Lost Boy Cavern
- 1 door (at F) leads out of dungeon to Lost Boy's Hidden Bastion
Zone 4: Lost Boy's Hidden Bastion
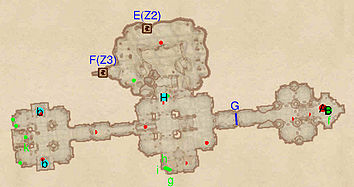
Like the third zone, you can enter this level from both Lost Boy Canyon (door E) and Lost Boy's Yawning Halls (door F). It is advisable to enter from the first, since only a small portion of Lost Boy Canyon can be accessed from this level. When entering you will find yourself in a large room with up to two enemies. You are, however, on a lower level, initially, so fighting might be challenging.
The next room is quite interesting: apart from containing up to three enemies it also holds one of the several "drunken goblins" in Cyrodiil and what were Vangaril's quarters. Here you will find, distributed on two tables and a ledge, a full set of Novice Alchemy apparatus, five soul gems, a silver dagger, three notes and two heads: a zombie and a skeleton one.
From here you are forced to go up the stairs, as gate G is locked. These will lead you to a room with two enemies, five chests and two stone slabs (b), which can be used for sleeping. One of the chests, k, holds the key to open the gate at G. In the next room, if you are level 23 or over, you will find the Lich Erandur-Vangaril (A) along with the boss-level chest (B) and a skeleton corpse.
Occupants:
- Lich Erandur Vangaril (non-respawning) at location A on map
- 2 Necromancer Enemies (each 50% probability Necromancer, 50% Undead)
- 0-1 Melee Skeleton
- 2-3 Skeleton Archers
- 1-4 Undead Enemies (each 83% probability Undead, 17% Rat)
Treasure:
- 1 boss-level Chest (Undead variety; locked) at location B on map
- 1 Chest 01
- 1 Chest 02
- 1 Chest 02
- 1 Chest 03
- 1 Chest 03
- 1 Wooden Chest (contains Lost Boy's Key which opens Old Wooden Door, Folded Page, empty petty soul gem; non-respawning) at k
- 1 Folded Page at f
- An open letter to the Guild of Mages, A letter for the Once Great Mage's council, and An open threat to the Guild of Mages at g, h, and i
- The following alchemy equipment will always be found: 1 Novice Alembic, 1 Novice Calcinator, 1 Novice Mortar & Pestle, and 1 Novice Retort
- The other following items will always be found: 3 empty lesser soul gems, 2 empty petty soul gems, 2 samples of Bonemeal, and 1 Silver Dagger
- Some of the above items are clustered at location h: 1 Bonemeal, 1 Novice Calcinator, 1 Novice Mortar & Pestle, 1 Silver Dagger, 3 empty lesser soul gems, and 2 empty petty soul gems
Doors and Gates:
- There are two doors in/out of this zone
- 1 door (at E) leads to the zone Lost Boy Canyon
- 1 door (at F) leads to the zone Lost Boy's Yawning Halls
- 1 Old Wooden Door at G (locked, opened by Lost Boy's Key found in a chest in the westernmost room)
Other:
- 1 Dead Goblin (may carry a lockpick) perched on an inaccessible archway at location H on map (over the stairs connecting the initial cave with the first fort-like room). You'll know you're crossing under the archway when you see several beer bottles strewn about the floor. It is possible to jump and open the chest if your Acrobatics is high enough (>75 is a good bet); it is also possible to jump from the top of the rock pillar near the archway.
- 2 sleeping slabs at b
