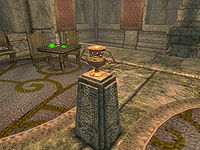
Shivering:Dunroot Burrow
|
|||
|---|---|---|---|
| # of Zones | 5 | ||
| Occupants | |||
| Elytras Felldew Addicts, Joofy the Brown (1 boss-level Elytra) |
|||
| Important Treasure | |||
| 1 Chalice of Reversal 1 Mute Screaming Maw plant 1 boss-level Hollowed Stump 2 Hollowed Amber Limbs 1 Hollowed Amber Stump |
|||
| Console Location Code(s) | |||
| XPDunrootBurrowExterior, XPDunrootBurrow01, XPDunrootBurrow02, XPDunrootBurrow03, XPDunrootBurrow04, XPDunrootBurrow05 | |||
| Region | |||
| Mania | |||
| Location | |||
| Northwest of New Sheoth, southwest of Highcross | |||
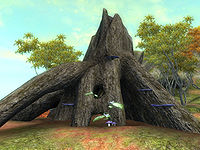
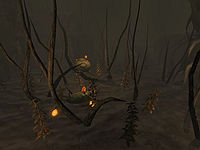
Dunroot Burrow is a very large hive cave southwest of Highcross containing Elytra (quest-related). It contains five zones: Dunroot Burrow, Dunroot Burrow, Kelp Fen, Dunroot Burrow, Drone Tunnels, Dunroot Burrow, Bramble Halls, and Dunroot Burrow, Sanctum of Decadence.
Related Quests
- Addiction: Return the Chalice of Reversal to Thadon, the Duke of Mania.
- The Museum of Oddities: Una Armina wants you to find "Oddities" for her museum.
Notes
- This cave cannot be accessed before the related quest as the Felldew needed to open the membrane blocking the entrance is only found on a particular Elytra which only appears during the quest. The secret entry located on the other side of the hill also has a key-requiring lock. The cave can be freely accessed from both entries once the quest is complete - the only change being the absence of the Chalice in the final zone.
- This cave contains 220 Flame Stalk plants, 27 Screaming Maw plants, 5 Watcher's Eye plants, and 149 Root Stalk plants.
Exterior
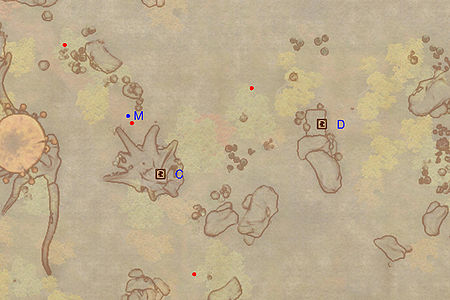
- The exterior is located at coordinates: SEWorld 5, 12
- This location's map marker (M on map) is named Dunroot Burrow (editor name XPDunrootBurrowMapMarker). The entrance door is SSE of the marker, 80 feet away.
- 1 Felldew Elytra Hatchling (non-respawning) is near the entrance
- 2 Monsters (Mania) are near the entrance
- 1 Elytra (Mania) is near the entrance
- The following plants can be found near the entrance: 11 Alocasia plants, 17 Hydnum Azure plants, 15 Red Kelp plants, 1 Mushroom Tree Sapling plant, and 9 Worm's Head plants
Zone 1: Dunroot Burrow
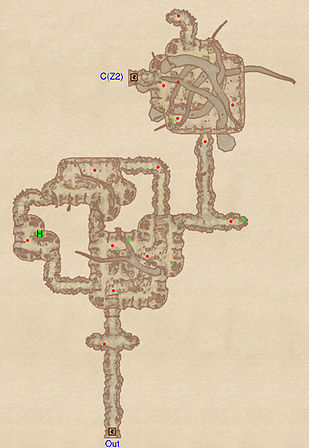
After following a long corridor, you will arrive in a large room on two levels - you will be on the lower one, in an open-air tunnel. The Elytra nearby will secrete Felldew. Continuing along the tunnel, you will eventually reach a room with a tree-trunk leading to the upper level and an intersect. Both paths lead to the upper level of the first room, but by heading right you will encounter a Felldew-carrying Elytra and the Hollowed Amber Limb at H. The Elytra at the end of the next corridor will secrete Felledew.
In the final room before door C, you will find yourself on a lower level along with one or two Elytra. Fighting them in the open is likely to attract the three on the upper level so sneaking and sniping is advised. Climb up the large trunk to access door C to Dunroot Burrow, Kelp Fen. The Elytra just in the northernmost tunnel carries Felldew.
Occupants:
- 5 Felldew Elytras (non-respawning)
- 4 Elytras (Mania)
- 5 Elytras (Mania, always best possible level)
Treasure:
- 1 Hollowed Amber Limb (1-4 Amber; non-respawning) at location H on map
- 2 Hollowed Stumps
- 2 Hollowed Stumps (Healing)
- The following plants will always be found: 86 Flame Stalk plants, 8 Screaming Maw plants, 2 Mushroom Tree Sapling plants, 3 Watcher's Eye plants, and 57 Root Stalk plants
Doors and Gates:
- There are two doors in/out of this zone
- 1 door (at Out) leads outside
- 1 door (at C) leads to the zone Dunroot Burrow, Kelp Fen
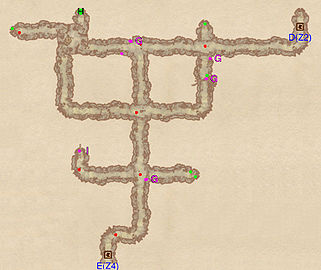
Zone 2: Dunroot Burrow, Kelp Fen
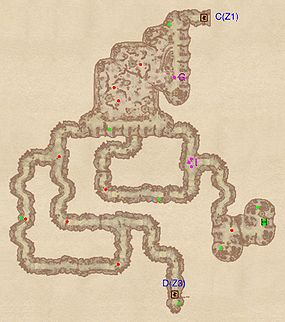
You enter this zone from door C and will exit it through door D. In the first room you arrive in, you will find yourself on a higher level, overlooking a large pond full of Red Kelp plants. This is a particularly good location to snipe on the three Elytras found below, although be wary of the Spore Pod trap (G) nearby. Trudge in the knee-height water until you reach an intersect guarded by three Root Spike traps (I). Continuing along the corridor will eventually lead you to door D; but heading right will grant you access to a Felldew-secreting Elytra, two hollowed stumps and a Hollowed Amber Stump (H). Further along the main corridor you will come across another junction - both ways lead to door D, although that departing from the right houses two Elytra (one carrying Felldew) rather than one.
Occupants:
- 2 Felldew Elytras (non-respawning)
- 5 Elytras (Mania)
- 2 Elytras (Mania, always best possible level)
Treasure:
- 1 Hollowed Amber Stump (1-4 Amber; non-respawning) at location H on map
- 2 Hollowed Stumps
- 5 Hollowed Stumps (Healing)
- The following plants will always be found: 64 Flame Stalk plants, 44 Red Kelp plants, 12 Screaming Maw plants, 6 Mushroom Tree Sapling plants, 2 Watcher's Eye plants, and 28 Root Stalk plants
Traps:
- 3 Root Spikes traps at location I on map
- 1 Spore Pod trap at G
Doors and Gates:
- There are two doors in/out of this zone
- 1 door (at C) leads to the zone Dunroot Burrow
- 1 door (at D) leads to the zone Dunroot Burrow, Drone Tunnels
Zone 3: Dunroot Burrow, Drone Tunnels
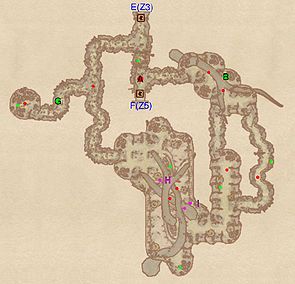
Although this zone presents many intersects, it is actually quite simple to navigate. Don't head left at the first intersect unless you wish to loot the hollowed stump protected by two Root Worm traps (G). The quickest way to reach the Felldew-secreting Elytra and the Hollowed Amber Limb (H) it is guarding is by carrying on along the corridor, but this involves negotiating three more Root Worm traps (G). An easier opportunity is to head left at the nearby junction and then right at the next one.
Return to the second intersect and head south to find yet another junction guarded by two Root Worm traps (G). Left are two hollowed stumps while an Felldew-carrying Elytra and a Root Spikes trap (I) are found to the right. Follow the original corridor south to reach door E to the Bramble Halls.
Occupants:
- 2 Felldew Elytras (non-respawning)
- 4 Elytras (Mania)
- 1 Elytra (Mania, always best possible level)
Treasure:
- 1 Hollowed Amber Limb (1-4 Amber; non-respawning) at location H on map
- 2 Hollowed Stumps
- 3 Hollowed Stumps (Healing)
- The following plants will always be found: 36 Flame Stalk plants, 3 Screaming Maw plants, 5 Mushroom Tree Sapling plants, and 12 Root Stalk plants
Traps:
- 1 Root Spikes trap at location I on map
- 7 Root Worm traps at G
Doors and Gates:
- There are two doors in/out of this zone
- 1 door (at D) leads to the zone Dunroot Burrow, Kelp Fen
- 1 door (at E) leads to the zone Dunroot Burrow, Bramble Halls
Zone 4: Dunroot Burrow, Bramble Halls
Unlike the previous zone, this one is more complex. Your ultimate objective in this level is door F, leading to the final portion of the dungeon. While this is right in front of you when you enter through door E, a set of branches obstruct the way, forcing you to go the long way to reach the door. Sneaking is advised as you enter this zone in order to avoid alerting the boss-level Elytra at A. Be sure to turn right at the first intersect you meet to collect the rare Mute Screaming Maw plant at G.
The first room you enter is on two levels - your position on the highest of the two gives you a perfect position to snipe the two Elytra below you. Make sure not to miss out on the hollowed stump on the far south of the higher level. At the next intersect, take the path to the right as it will lead you to an Elytra carrying Felldew. Continue along the corridor until you arrive in a room with two Elytras and a boss-level hollowed stump (B). You have now reached door F; kill the boss-level Elytra and enter the Sanctum of Decandence.
Occupants:
- 1 boss-level Elytra (Mania) at location A on map
- 2 Felldew Elytras (non-respawning)
- 2 Elytras (Mania)
- 4 Elytras (Mania, always best possible level)
Treasure:
- 1 Mute Screaming Maw plant at location G on map
- 1 boss-level Hollowed Stump (Monster variety) at B
- 3 Hollowed Stumps
- 3 Hollowed Stumps (Healing)
- The following plants will always be found: 34 Flame Stalk plants, 4 Screaming Maw plants, 33 Mushroom Tree Sapling plants, and 52 Root Stalk plants
Traps:
- 2 Root Spikes traps at location I on map
- 1 Spore Pod trap at H
Doors and Gates:
- There are two doors in/out of this zone
- 1 door (at E) leads to the zone Dunroot Burrow, Drone Tunnels
- 1 door (at F) leads to the zone Dunroot Burrow, Sanctum of Decadence
Zone 5: Dunroot Burrow, Sanctum of Decadence
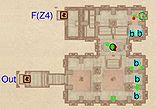
While the other four zones are all root caves, this level is a cathedral-like ruin with numerous statues lined up along the walls. After hiking up a pair of steep stairs you will find yourself in a luscious felldew addict den. Joofy the Brown and his fellow addicts will attack you on sight but shouldn't pose much of a problem. The chalice is placed in the middle of chamber, at Q.
In the living area near the stairs is a table with silverware and a felldew portion, a few books (G) and two double beds (b). The adjacent room contains three separate living areas with double beds (b), cupboards, felldew and clothing. A pair of the very rare wrist irons can be found atop one of the cupboards. An 'intoxication area' in the middle houses a large number of cheap wine bottles, silverware and, of course, portions of felldew. Exit through the nearby door at Out which leads outside, on the other side of the hill from the main entrance.
Occupants:
- Joofy the Brown (non-respawning)
- 2 Felldew Addicts (non-respawning)
Treasure:
- 1 Chalice of Reversal at location Q on map
- 5 Cupboards (non-respawning)
- 6 Felldews
- The following books will always be found: 1 The Lusty Argonian Maid, 1 An Elytra's Life, 1 Bark and Sap, 1 Myths of Sheogorath, 1 Saints and Seducers, 1 The Blessings of Sheogorath, 1 The Prophet Arden-Sul, 1 The Shivering Bestiary, and 1 The Standing Stones
- The other following items will always be found: 1 Wrist Irons
- Some of the above items are clustered at location G: 1 An Elytra's Life, 1 Bark and Sap, 1 Felldew, 1 Myths of Sheogorath, 1 Saints and Seducers, 1 The Blessings of Sheogorath, 1 The Prophet Arden-Sul, 1 The Shivering Bestiary, and 1 The Standing Stones
Doors and Gates:
- There are two doors in/out of this zone
- 1 door (at Out) leads outside
- 1 door (at F) leads to the zone Dunroot Burrow, Bramble Halls
Other:
- 5 beds at locations b on map
