Oblivion:Toadstool Hollow
|
|||
|---|---|---|---|
| # of Zones | 3 | ||
| Occupants | |||
| Undead Enemies | |||
| Console Location Code(s) | |||
| ToadstoolHollowExterior, ToadstoolHollow, ToadstoolHollow02, ToadstoolHollow03 | |||
| Region | |||
| Great Forest | |||
| Location | |||
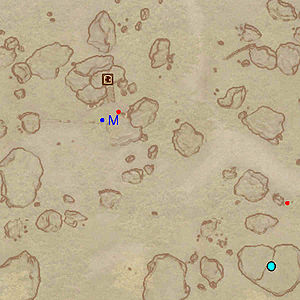
| South of Bruma, just northwest of the intersection of the Orange and Silver Roads | |||
Toadstool Hollow is a medium-sized cave south of Bruma containing undead. It contains three zones: Toadstool Hollow, Toadstool Hollow Tunnels, and Toadstool Hollow Doubleback.
Notes
- This cave contains 3 Cairn Bolete plants and 8 Wisp Stalk plants.
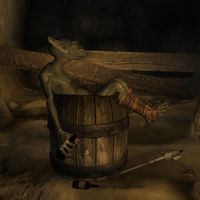
- The first zone in this dungeon contains one of the many drunken goblins found through dungeons in Cyrodiil. The door to the room containing it is locked and can either be picked or opened with the Toadstool Grog Key, which is hidden under a steel helmet in a room in the zone Toadstool Hollow Doubleback. Interestingly, the word "grog" is an old British Navy term referring traditionally to a beverage containing "two parts water, two parts Pusser's Rum".
- Toadstool Hollow also appeared in ESO.
Exterior
- The exterior is located at coordinates: Tamriel 8, 32
- This location's map marker (M on map) is named Toadstool Hollow (editor name ToadstoolHollowMapMarker). The entrance door is N of the marker, 40 feet away.
- 1 Daedra (spawns by Oblivion Gate) is near the entrance
- 1 Wilderness Creature (Mountains variety) is near the entrance
- The following plants can be found near the entrance: 8 Clouded Funnel Cap plants, 1 Milk Thistle plant, 1 Monkshood plant, and 3 Motherwort plants
- 1 Oblivion Gate is at location O on map
Zone 1: Toadstool Hollow

The Drunken Goblin of Toadstool Hollow
|
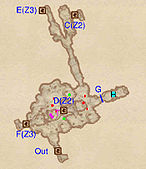
Your main objectives for this dungeon are to progress deeper into the cave by entering either Toadstool Hollows Tunnels (C), or Toadstool Hollow Doubleback (E), or to see the drunken goblin at H. This zone is broken up into three different floors, the uppermost floor contains doors F and D, which lead to Toadstool Hollow Tunnels and Toadstool Hollow Doubleback respectively, and the rocks, which fall onto the middle floor as part of trap T. The middle floor, which is the one you start on, is composed of one large chamber with a trap (T) in its center. The trap on this floor can be avoided by either staying to the edges of this floor, or by being quick enough to run by the rocks as they are falling. To the right of the hole from which the rocks fell from as part of trap T, there is another hole leading to the lowest of the three floors in this zone. However, make sure that you do not accidentally fall down this hole, because there is no way to go between floors short of going through either Toadstool Hollow Tunnels or Toadstool Hollows Doubleback again. The hole leads you into a large chamber similar to the one on the middle floor, but there is a gate at G, and a passage leading to doors E and C, on this floor.
The gate at G has a hard lock placed upon it, so if you decide that you want to see the drunken goblin at H, it is recommended that you take door E into Toadstool Hollow Doubleback and take the Toadstool Grog Key under the steel helmet, which unlocks the gate at G. The goblin at H is sitting in a barrel next to a silver warhammer, which can be useful for lower level characters.
Occupants:
Treasure:
- 2 Chests 01 (1 locked)
- The following weapons will always be found: 1 Silver Warhammer
- The following plants will always be found: 2 Wisp Stalk plants
Traps:
- 2 Cave In traps at location T on map
Doors and Gates:
- There are five doors in/out of this zone
- 1 door (at Out) leads outside
- 2 doors (at C and D) lead to the zone Toadstool Hollow Tunnels
- 2 doors (at E and F) lead to the zone Toadstool Hollow Doubleback
- 1 Wood Door at G (locked, opened by Toadstool Grog Key)
Other:
- 1 Dead Goblin (may carry a lockpick) at location H on map
Zone 2: Toadstool Hollow Tunnels
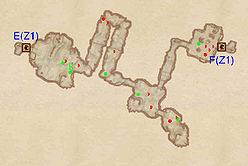
Your main objective in this zone is to either collect the loot found within, or to go through door D, if you are trying to leave Toadstool Hollow. Typically, you will enter this zone from door C, but you can enter this zone from door D if you went through the Toadstool Hollow Doubleback to get to the third floor of Toadstool Hollow, which is where door D leads. This zone has a large number of minor loot chests, but also has a large potential number of enemies, so be prepared for fairly large battles against the undead.
Occupants:
- 3-8 Undead Enemies (each 83% probability Undead, 17% Rat)
- 3-7 Nuisance Animals
Treasure:
- 2 Chests 01 (both locked)
- 2 Chests 01
- 1 Chest 02
- 1 Chest 03
- 1 Chest 03
- 1 Chest 04
- 1 Chest 04
- The following plants will always be found: 1 Cairn Bolete plant
Doors and Gates:
- There are two doors (at D and C) in/out of this zone, both leading to the zone Toadstool Hollow
Zone 3: Toadstool Hollow Doubleback
Your main objective in this zone is to either collect the loot found within, or to go through door F, if you are trying to leave Toadstool Hollow. Door F leads to the third floor of Toadstool Hollow, from which you can drop down to the middle level of Toadstool hollow and leave, or enter Toadstool Hollow Tunnels through door D. In the first room you come to if you entered the zone through door E, there is a steel helmet lying on a stone tablet in the center of the room, and underneath this helmet is the Toadstool Hollow Grog key at K. While this zone contains only two definite enemies, it still may pose a threat depending on how many enemies spawn at the possible spawn locations, so use caution when clearing it out.
Occupants:
- 2-9 Undead Enemies (each 83% probability Undead, 17% Rat)
- 1-4 Nuisance Animals
Treasure:
- 1 Chest 02
- 1 Chest 02 (locked)
- 1 Chest 03
- 2 Chests 04
- Toadstool Grog Key at location k on map
- The following armor will always be found: 1 Steel Helmet
- The following plants will always be found: 2 Cairn Bolete plants and 6 Wisp Stalk plants
Doors and Gates:
- There are two doors (at E and F) in/out of this zone, both leading to the zone Toadstool Hollow


