Oblivion:Random Oblivion World 4
| Oblivion World: Random Oblivion World 4 |
|
|---|---|
| # of Peripheral Towers | 3 |
| # of Non-Random Caves | 1 |
| Important Treasure | |
|
|
| Console Location Code | |
| Worldspace: OblivionRD004 OblivionRD004Caves OblivionRD004CitadelLeft OblivionRD004CitadelLeftHall01 OblivionRD004CitadelLeftHall02 OblivionRD004CitadelLeftLord OblivionRD004CitadelMain OblivionRD004CitadelMainHall01 OblivionRD004CitadelMainHall02 OblivionRD004CitadelMainHall03 OblivionRD004CitadelMainLord OblivionRD004CitadelRight OblivionRD004CitadelRightHall01 OblivionRD004CitadelRightHall02 OblivionRD004CitadelRightLord OblivionRD004Submerged Tower |
|
| Fixed Gate | |
| Gate outside Skingrad (map) (after Dagon Shrine has been completed). | |
Random Oblivion World 4 is a medium-sized World, and one of seven randomly chosen Oblivion Worlds.
The Oblivion gate in front of Skingrad always connects to this world.
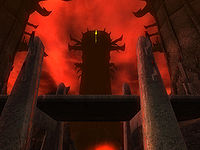
In this world there are always three towers: the main tower is The Brooding Fortress, but there are two more towers that are very similar to main towers: The Sorrow Keep and The Anguish Keep. The difference is very noticeable once you enter them: there is no central pillar of fire going up to the top of the tower.
The standard route is to ascend one of the two side towers, to the top Shrine room (which looks very similar to a Sigillum Sanguis, except there is no Sigil Stone). On the way up (in between the Halls of Eternal Twilight and the Halls of Shame) you will pass an exterior door but for now it only leads to a retracted bridge. In the Shrine room, you will activate the "geared batten," triggering a large gear mechanism and a message that you have opened one of two locks.
In the Shrine room there is a second exterior door; that bridge has now been extended, allowing you to go directly to the Shrine room of the second peripheral tower. Over there you will find another "geared batten" to release the second lock. This extends bridges that connect the peripheral towers to the main towers (but also retracts the bridge between the two peripheral towers). Descend through the Halls of Shame to the lower-level exterior door, and now you can cross to the Brooding Fortress. From there, you will need to ascend one level (through the Corridors of Dark Salvation) to the standard Sigilum Sanguis.
Índice
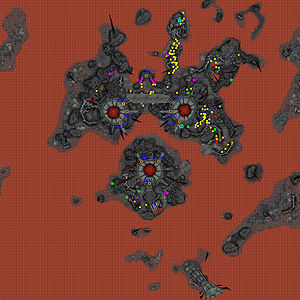
Exterior
If you are not averse to some lava damage or have high acrobatics, it is also possible to completely bypass the two peripheral towers. Just run straight towards the main tower, crossing one channel of lava in the process. You can then work your way up the main tower. Although this requires you to make it through the two lower rooms in the main tower (the Rending Halls and Desolation's End) that are not required if you take the other route, overall this is a shorter path.
If you wish to explore the surface, you will find several more fleshy pods. Also, particularly adventurous explorers can get out of the standard map area and access the vast expanse of nothingness that exists on the other side of the lava. This requires crossing the lava a couple times; Water Walking can be useful to run across the lava rather than swim through it, but you will still suffer damage. To the east of the map are two medium sized islands: the northern one is easiest to run across to, but the southern one is where you are headed. On the east side of the southern island is an area where more land is visible to the southeast. Run across the lava one last time and you will find yourself in an immense, flat, and empty land.
Occupants:
- 4-6 Daedric occupants (Daedra creatures or Dremora)
Treasure:
Traps:
- 5 Fire Turrets at locations f on map
- 2 Claw Traps at locations s on map
Doors and gates:
- There are eleven doors in/out of this zone
- 1 Oblivion Gate (at OG) leads to Tamriel
- 1 door (at A) to The Sorrow Keep (L1)
- 1 door (at B, only reachable by bridge via The Anguish Shrine) to The Sorrow Shrine (L4)
- 1 door (at C) to The Anguish Keep (R1)
- 1 door (at D, only reachable by bridge via The Sorrow Shrine) to The Anguish Shrine (R4)
- 1 door (at E, only reachable by bridge via The Brooding Fortress) to The Sorrow Shrine (L4)
- 1 door (at F, only reachable by bridge via The Brooding Fortress) to The Anguish Shrine (R4)
- 1 door (at G) to The Brooding Fortress (M1)
- 2 doors (at H, only reachable by bridge) to The Brooding Fortress (M1)
- 1 door (at I) to the Molten Halls (B1)
- 3 doors (at E) to The Brooding Fortress
Plants:
- Plants are marked by yellow dots on map
- 41 Blood Grass plants
- 12 Harrada Root plants
- 40 Spiddal Stick plants
Other:
- 1 Blood Fountain at location b on map
- 1 Magicka Essences at location m on map
The Sorrow Keep
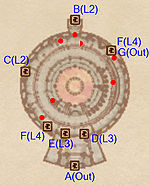
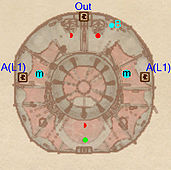
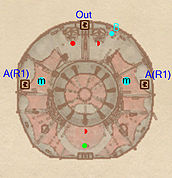
The Sorrow Keep is the left tower as seen from first entering this Oblivion World. It's identical in layout to its twin The Anguish Keep but differs somewhat in objects found inside (this tower has a few more creatures, but less traps). The Sorrow Keep looks very similar to the usual Main Towers from the inside, except that it contains no fire pillar in the middle. The door opposite to the main entrance leads to the first hallway upstairs.
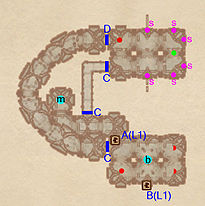
The first level can be reached by passing through the Halls of Eternal Twilight. This consists of three small platforms connected with two bridges. A Daedra can be found on the middle platform, along with a door leading outside. This leads to a bridge that can only be crossed if you have released one, not two, of the locks (otherwise it's retracted). On the last platform there is a door that leads to the second hallway upstairs.
The second level can be reached by passing through the Halls of Shame. Beware that a Daedra spawns right beside the door leading from it. This level consists mainly of a long winding ramp upstairs, at which two more Daedra can be found. At the top you will find two doors that both lead to The Sorrow Shrine.
Occupants:
- Ground level: 2-3 Daedric occupants (Daedra Creature or Dremora)
- First level: 1 Daedric occupant
- Second level: 2 Daedric occupants
Traps:
- Falling in the pool of lava in the middle of the ground level will result in instant death.
Doors and Gates
- There are 8 doors in/out of this zone
- The main door (at A, ground level) leads outside (Out)
- 2 doors (at B, ground level, and C, first level) to Halls of Eternal Twilight (L2)
- 2 doors (at D, first level, and E, second level) to Halls of Shame (L3)
- 1 door (at G, first level) leads outside to the bridge to The Brooding Fortress (M1)
- 2 doors (at F, second level) to The Sorrow Shrine (L4)
Halls of Eternal Twilight
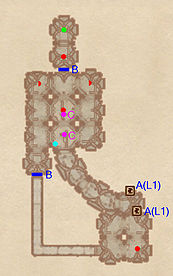
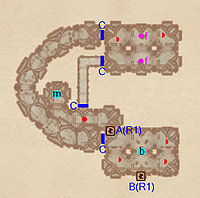
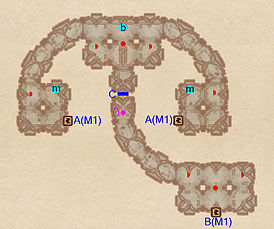
This hallway starts with a corridor leading upwards in the right direction. You will approach a room with a few Daedra in it, and a two Citadel Trident Blades. There is a door here that leads to a small room with a The Punished in it. Right next to the where you entered the room is a small corridor that leads even further upstairs. There you will find one more Daedra and the door back to The Sorrow Keep.
Occupants:
- 3-5 Daedric occupants (Daedra Creature or Dremora)
Treasure:
Traps:
- 2 Citadel Trident Blades at locations C on map
Doors and gates:
- There are two doors in/out this zone
- 2 doors (at A) lead to The Sorrow Keep (L1)
- 2 doors (initially closed) at locations B
Halls of Shame
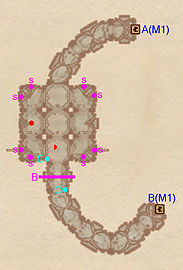
You start out in a small room, where a Magicka Fountain can be found at left end, with a door in front of you. Behind that door is a small passage to a larger room upstairs. That room contains a The Punished as well as a Daedra. Be careful along the walls for the Citadel Spikes. Another large winding corridor will lead you to a door and the upper room behind it, where more Daedra (1-3) can be found. The door there will lead you back to The Sorrow Keep, but don't forget to use the Blood Fountain to replenish your health.
Occupants:
- 2-4 Daedric occupants (Daedra Creature or Dremora)
Treasure:
Traps:
- 6 Citadel Spikes at locations s on map
Doors and gates:
- There are two doors in/out this zone
- 1 door (at A, downstairs) leads to The Sorrow Keep (L1)
- 1 door (at B, upstairs) leads to The Sorrow Keep (L1)
- 3 doors (initially closed) at locations C
- 1 door (initially open) at location D
Other:
- 1 Blood Fountain at location b on map
- 1 Magicka Essences at location m on map
The Sorrow Shrine
The Sorrow Shrine is similar to the Sigillum Sanguis found in Main Towers, except that there is no Sigil Stone. Instead there is a Geared Battern on the top that releases one of the two locks required to activate the bridges to the Main Tower. At the top of the winding ramp to the entrance of the Shrine you can find a door that leads outside, to the bridge to The Anguish Shrine. This bridge will extend if you release the first lock, but will retract again once you release the second lock.
You can find a few Daedra, two Magicka Essences and a The Punished on the upper levels. Be careful if you are sneaking that the Daedra can spot you easier than that you're used to, due to the openness of the area. Once you have activated the Geared Battern on top of the shrine, one lock will be released. If this is the first lock you have released, you can use pass through the exterior door to pass the bridge to The Anguish Shrine. If it is the second lock, you will need to the descend to the first level of The Sorrow Keep for the door to the Brooding Fortress.
Occupants:
- 0-1 Daedra Creature (always best possible level)
- 1-2 Daedra Creatures
Treasure:
Doors and gates:
- There are three doors in/out this zone
- 2 doors (at A) lead to The Sorrow Keep (L1)
- 1 door (at Out) leads outside to the bridge to The Anguish Shrine (R4)
Other:
- 1 Geared Battern at location B on map
- 2 Magicka Essences at locations m on map
The Anguish Keep
The Anguish Keep is the right tower as seen from first entering this Oblivion World. It's identical in layout to its twin The Sorrow Keep but differs somewhat in objects found inside (this tower has a few more traps, and less creatures). The Anguish Keep looks very similar to the usual Main Towers from the inside, except that it contains no fire pillar in the middle. The door opposite to the main entrance leads to the first hallway upstairs.
The first level can be reached by passing through the Halls of Eternal Twilight. This consists of three small platforms connected with two bridges. A Daedra can be found on the middle platform, along with a door leading outside. This leads to a bridge that can only be crossed if you have released one, not two, of the locks (otherwise it's retracted). On the last platform there is a door that leads to the second hallway upstairs.
The second level can be reached by passing through the Halls of Shame. Beware that a Daedra spawns right beside the door leading from it. This level consists mainly of a long winding ramp upstairs, at which two more Daedra can be found. At the top you will find two doors that both lead to The Anguish Shrine.
Occupants:
- Ground level: 1-3 Daedric occupants (Daedra Creature or Dremora)
- First level: 1 Daedric occupant
- Second level: 1-3 Daedric occupants
Traps:
- Falling in the pool of lava in the middle of the ground level will result in instant death.
Doors and gates:
- There are 8 doors in/out of this zone
- The main door (at A, ground level) leads outside
- 2 doors (at B, ground level, and C, first level) to Halls of Eternal Twilight (R2)
- 2 doors (at D, first level, and E, second level) to Halls of Shame (R3)
- 1 door (at G, first level) leads outside to the bridge to The Brooding Fortress (M1)
- 2 doors (at F, second level) lead to The Sorrow Shrine (R4)
Halls of Eternal Twilight
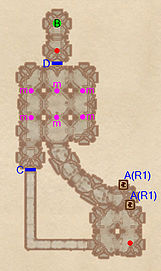
This hallway starts with a corridor leading upwards in the right direction. You will approach a room littered by Land Mines. An efficient way to disable those mines is to fire a small ranged Fire Damage spell on it. Remember to dodge the returned Fire Damage spell when the mine detonates. There is a locked door here that leads to a small room with a boss-level The Punished in it, but it is guarded by one Daedra. Right next to the where you entered the room is a small corridor that leads even further upstairs. There you will find one more Daedra and the door back to The Sorrow Keep.
Occupants:
- 2 Daedric occupants (Daedra Creature or Dremora)
Treasure:
- 1 boss-level The Punished at location B on map
Doors and gates:
- There are two doors in/out this zone
- 2 doors (at A) lead to The Sorrow Keep (R1)
- 1 door (initially closed) at location C
- 1 door (Average locked) at location D
Traps:
- 6 Land Mine traps at locations m on map
Halls of Shame
You start out in a small room, where a Magicka Fountain can be found at left end, with a door in front of you. A Daedra will be spawned right in front of you. Behind the next door is a small passage to a larger room upstairs. That room contains two Fire Turrets as well some Daedra (though it's possible you will encounter none). Another large winding corridor will lead you to a door and the upper room behind it, where more Daedra may be found. The door there will lead you back to The Anguish Keep, but don't forget to use the Blood Fountain to replenish your health.
Occupants:
- 1-6 Daedric occupants (Daedra Creature or Dremora)
Doors and gates:
- There are two doors in/out this zone
- 1 door (at A, downstairs) leads to The Anguish Keep
- 1 door (at B, upstairs) leads to The Anguish Keep
- 4 doors (initially closed) at locations C
Traps:
- 2 Fire Turrets at location f on map
Other:
- 1 Blood Fountain at location b on map
- 1 Magicka Essences at location m on map
The Anguish Shrine
The Anguish Shrine is similar to the Sigillum Sanguis found in Main Towers, except that there is no Sigil Stone. Instead there is a Geared Battern on the top that releases one of the two locks required to activate the bridges to the Main Tower. At the top of the winding ramp to the entrance of the Shrine you can find a door that leads outside, to the bridge to The Sorrow Shrine. This bridge will extend if you release the first lock, but will retract again once you release the second lock.
You can find a few Daedra, two Magicka Essences and a The Punished on the upper levels. Be careful if you are sneaking that the Daedra can spot you easier than that you're used to, due to the openness of the area. Once you have activated the Geared Battern on top of the shrine, one lock will be released. If this is the first lock you have released, you can use pass through the exterior door to pass the bridge to The Sorrow Shrine. If it is the second lock, you will need to the descend to the first level of The Anguish Keep for the door to the Brooding Fortress.
Occupants:
- 0-1 Daedra Creature (always best possible level)
- 1-2 Daedra Creatures
Treasure:
Doors and gates:
- There are three doors in/out this zone
- 2 doors (at A) lead to The Anguish Keep
- 1 door (at Out) leads outside to the bridge to The Sorrow Shrine (L4)
Other:
- 1 Geared Battern at location B on map
- 2 Magicka Essences at locations m on map
The Brooding Fortress
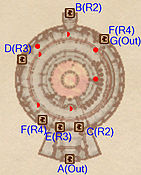
This tower consists of four levels. One ground level and three upper levels. You will likely not enter this Main Tower by the usual Tower Portal door, but instead by a bridge and a small door. This means you will start out on the second level, instead at the ground level, and you only have to ascend one level to reach the doors to Sigillum Sanguis. You can choose to descent first for a bit of extra treasure.
You can find two The Punished as well a possible few Daedra on the ground level. They are mostly hidden in the hallway adjacent to the main column. You can use the Tower Portal door to explore the exterior area around The Brooding Fortress. Left and right from the Tower Portal are two doors both to the Rending Halls.
The first level consists of a small platform, with two doors to the Rending Halls at the middle, with two ramps leading upwards both left and right. Before the ramps meet there will be a door to at either end to Desolations End. You will encounter at least one Dremora here and possible some Daedra creatures.
The second level starts with a lower platform with three doors. Two will lead outside to the bridges to The Sorrow Keep and The Anguish Keep, one leads to the Rending Halls. At this lower platform some Daedra creatures can be encountered. If you follow the platform winding upwards (clockwise), you may encounter one more Daedra creature with the door to the Corridors of Dark Salvation right behind it.
The third level also consists of two platforms above each other, connected by a spiraling ramp. The door at the lower end connects to the Corridors of Dark Salvation, and the two doors at the upper platform both lead to Sigillum Sanguis. You will encounter a couple of Dremora (and Dremora Mages) on this level.
Occupants:
- Ground level: 0-3 Dremora
- First level: 1 Dremora and 0-2 Daedra creatures
- Second level: 0-3 Daedra creatures
- Third level: 1 Dremora (always best possible level), 2 Dremora Mages and 1-2 Dremora
Treasure:
Traps:
- Falling in the pool of lava in the middle of the ground level will result in instant death.
- Touching the fire pillar in the middle of the room will result in instant death.
Doors and gates:
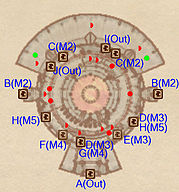
- There are 14 doors in/out this zone
- 1 Tower Portal door (at A, ground level) leads outside
- 2 doors (at B, ground level) lead to the Rending Halls (M2)
- 2 doors (at C, first level) lead to the Rending Halls (M2)
- 2 doors (at D, first level) lead to Desolations End (M3)
- 1 door (at E, second level) leads to Desolations End (M3)
- 1 door (at F, second level) leads to the Corridors of Dark Salvation (M4)
- 1 door (at I, second level) leads outside to the bridge to The Sorrow Keep (L1)
- 1 door (at J, second level) leads outside to the bridge to The Anguish Keep (R1)
- 1 door (at G, third level) leads to the Corridors of Dark Salvation (M4)
- 2 doors (at H, third level) lead to Sigillum Sanguis (M5)
Rending Halls
The two possible entrances from the ground level of The Brooding Fortress lead both to a corridor winding upwards, where they both meet at the upper room. All the Daedra can be found at this upper room, as well the two doors (next to each other) leading back to the first level of The Brooding Fortress.
Occupants:
- 1 Dremora Mage
- 0-2 Daedra creatures
Doors and gates:
- There are four doors in/out this zone
- 2 doors (at A) lead to The Brooding Fortress (M1)
- 2 doors (at B) lead to The Brooding Fortress (M1)
Desolations End
The center room of this zone is has three corridors leading from it. Two descent both to a small room containing a Magicka Essences, a possible Daedra and a door leading to the first level of The Brooding Fortress. The center room is quite well guarded by several Daedra and an armed Citadel Trident Blade trap. Behind a door is the last corridor winding upwards to the upper room, that is also quite well guarded. The door there leads to the second level of The Brooding Fortress.
Occupants:
- 2-6 Daedric occupants (Daedra Creature or Dremora)
- 0-2 Daedra creatures
Doors and gates:
- There are three doors in/out this zone
- 2 doors (at A) lead to The Brooding Fortress (M1)
- 1 door (at B) lead to The Brooding Fortress (M1)
- 1 door (initially closed) at location C
Traps:
- 1 Citadel Trident Blade at location D on map
Other:
- 1 Blood Fountain at location b on map
- 2 Magicka Essences at locations m on map
Corridors of Dark Salvation
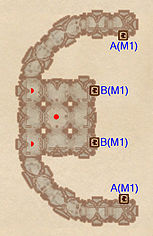
This zone is pretty straightforward. Ascend to center room through the large corridor. There you will find one or two Daedra, as well as Citadel Guillotine Blade that can be set off by two Claw Levers nearby. Beware of Citadel Spikes in the corners. You can continue by following the second large corridor upwards to the door back to The Brooding Fortress.
Occupants:
- 1 Daedric occupant (Daedra Creature or Dremora) (always best possible level)
- 0-1 Daedra Creature
Doors and gates:
- There are two doors in/out of this zone
- 1 door (at A) leads to The Brooding Fortress (M1)
- 1 door (at B) leads to The Brooding Fortress (M1)
Traps:
- 1 Citadel Guillotine Blade at location B on map
- 8 Citadel Spikes at locations s on map
- 2 Claw Levers (activate Citadel Guillotine Blade) at locations C on map
Sigillum Sanguis
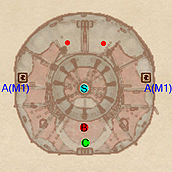
Ascend the ramp and pass through opening to find yourself in the room that contains the Sigil Stone. Here you can find a few Daedra, notably one boss-level Daedra. There are also two Magicka Essences and a boss-level The Punished on the upper levels. Be careful if you are sneaking that the Daedra can spot you easier than that you're used to, due to the openness of the area. Once you have reached the top you can grab the Sigil Stone to close the Oblivion Gate.
Occupants:
- 1 boss-level Daedric occupant (Daedra Creature or Dremora) at location B, highest level, on map
- 2 Daedra Creatures
Treasure:
- 1 boss-level The Punished at location C, highest level, on map
- 1 random Sigil Stone at location S, highest level, on map
Traps:
- Touching the fire pillar in the middle of the room will result in instant death.
Doors and gates:
- There are two doors in/out of this zone
- 2 doors (at A) lead to The Brooding Fortress (M1)
Molten Halls
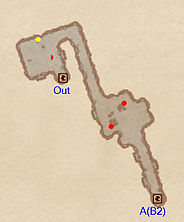
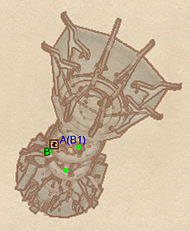
There is one hidden bonus area in this world. South of the ground-level entrance to the main tower are the Molten Halls. This cave leads south under the lava to the tilted tower you can see to the south, Quake Ruin. The cave itself is straightforward, with Daedra at the open places, and no treasure. At the end you will find the door to Quake Ruin.
Occupants:
- 2-3 Daedric occupants (Daedra Creature or Dremora)
Doors and gates:
- There are two doors in/out of this zone
- 1 door (at Out) leads outside
- 1 door (at A) leads to Quake Ruin (B2)
Other:
- 1 (aggressive) Harrada Root plant marked by a yellow dot on map
Quake Ruin
This lower part of this tower is submerged in lava, but you can climb upwards using the small winding ramp. Along the way you will find the first two Fleshy Pods. You may need enhanced acrobatics to reach the third fleshy pod, because the ramps in the tilted tower can be very steep. Alternatively, running along the curb by the side of the ramp can make the climb easier.
Treasure:
- 1 boss-level Flesh Pod Sack01 at location B on map
- 2 Fleshy Pods
Doors and gates:
- There is one door in/out of this zone
- 1 door (at A) leads to Molten Halls (B1)
