Oblivion:Fort Alessia
| This page is currently being redesigned for the Oblivion Places Redesign Project (OPRP). The page needs in-game walkthrough(s) to go along with the maps and content lists. If you make an addition to this page, please update this template accordingly, but make sure you have observed the project guidelines. Needs in-game verification. See the OPRP project page for explanation of what needs to be to complete the verification process. |
|
|||
|---|---|---|---|
| # of Zones | 2 | ||
| Occupants | |||
| Marauders (1 boss-level Marauder) |
|||
| Important Treasure | |||
| 1 boss-level Chest | |||
| Console Location Code(s) | |||
| FortAlessiaExterior, FortAlessia, FortAlessia02 | |||
| Region | |||
| Heartlands | |||
| Location | |||
| On the Red Ring Road, southeast of the Imperial City, west of the bridge over the Upper Niben | |||
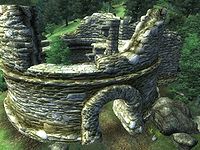
Fort Alessia is a medium-sized fort between the Imperial City and Bravil containing marauders. It contains two zones: Fort Alessia and Fort Alessia Assembly Hall.
Notes
- The first zone contains two small corridors which open out onto a small hall. There is a swinging mace trap and the Marauder enemies are usually separated into pairs.
- The second zone is made up of one small corridor that leads onto small bridge which spans a medium-sized hall, with a Marauder Battlemage on the bottom floor. Both exits from this room converge and lead into a small chamber with the Marauder Boss, which in turn opens back to the entrance to this zone via a gate.
- This fort is relatively easy to fight through; the enemies are usually fairly well spaced and the dungeon is fairly linear in layout. Because of this, and the fact that Marauders can sometimes sleep on the many bedrolls, this dungeon can be easily traversed by characters skilled in Sneak.
- The main loot to be found in this dungeon is in the non-respawning Skooma crate found in the Boss Chamber, the Boss Chest, and the equipment found on the Marauder Warlord.
Exterior
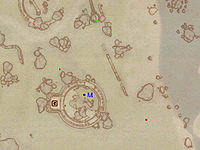
- The exterior is located at coordinates: Tamriel 12, 4
- This location's map marker (M on map) is named Fort Alessia (editor name FortAlessiaMapMarker). The entrance door is WSW of the marker, 60 feet away.
- 0-2 Marauder Enemies (each 50% probability melee , 25% Marauder Archer, 25% Dog) are near the entrance
- 2 Wilderness Creatures (Plains variety) are near the entrance
- 1 Wilderness Chest 01 (non-respawning) is near the entrance
- The following plants can be found near the entrance: 1 Fennel plant, 8 Flax plants, 5 Ginseng plants, 10 Monkshood plants, 1 Primrose plant, 3 Summer Bolete plants, and 10 Goldenrod plants
Zone 1: Fort Alessia
The best way to tackle this small zone is to turn right and follow the corridor down then up some stairs, setting off the trip wire which controls the Swinging Mace trap at the top of the second set of stairs. Take out the Marauder standing round the corner just past the mace trap, then tackle the Marauder standing near the bedroll round the next corner.
Standing next to this bedroll you will be looking out towards another wall across a small corridor-sized gap. Behind that wall and often just to the right is another Marauder, and occasionally another Marauder will be at the far end of the small hall or sleeping on the bedroll next to the entrance to the next zone. Watch out for another Marauder enemy who will come from the steps leading up and out of the hall, directly opposite the entrance to zone two.
Non-sneaky characters are liable to find that engaging in combat with one enemy brings the other inhabitants of this zone into the fray, and you may find yourself being attacked from behind. Watch out as the Marauders who are mostly randomly generated, can sometimes be a Battlemage or archer who, in this dark zone, can give you a nasty surprise.
There is no really valuable loot to be had here, but the bedrolls can provide a cheap way to heal or level up before the next zone.
Occupants:
- 3 Campsite Marauders (each 50% probability melee Marauder, 16% archer Marauder, 16% Marauder Battlemage, 16% dog)
- 0-1 Marauder Battlemage
- 1 melee Marauder
Treasure:
- 1 Chest 01 (locked)
- 1 Chest 02
- 2 Chests 04
- The following weapons will always be found: 1 Iron Longsword
Traps:
- 2 Swinging Mace traps at location D on map
- 1 Tripwire trigger at E
Doors and Gates:
- There are two doors in/out of this zone
- 1 door (at Out) leads outside
- 1 door (at C) leads to the zone Fort Alessia Assembly Hall
Other:
- 2 bedrolls at locations b on map
Zone 2: Fort Alessia Assembly Hall
Upon entering this zone walk towards the t-junction and turn right. There will be a Marauder waiting around the corner.
After taking the enemy out, follow the corridor, going round the second corner which will lead to a thin bridge spanning a medium-sized hall. There may be a Marauder patrolling the span of the bridge here, so watch out. If there is, how you deal with him will dictate how the following battles go. If you sneak-kill or sneak past him, then you will succeed in not alerting the Battlemage down below. If you engage him in open combat or alert him in any way, the ensuing fight will alert the Battlemage down below, which will in turn alert any Marauders that may patrol the other corridors.
Sneak towards the bridge in order to not alert the Marauder Battlemage who dwells down below and to the left (note: The Battlemage may be asleep on the bedroll). If you don't sneak here, the Battlemage will cause you problems as they will either throw destruction spells at you or run towards you via the corridor that leads out of the bottom floor of the hall. This may lead to more Marauders and Marauder Archers joining the fight, making the battle in the hall a large and dangerous one.
It is best to drop down from the bridge into the lower level of this hall in order to engage the Battlemage. Once the Battlemage has been taken care of, loot the chests and take the only exit out of the hall, the door in the eastern wall. Follow this corridor up and around three right turns. These corridors may contain 2 random Marauder enemies, the ones that may rush out as stated earlier. Take them out one at a time in order to avoid alerting the upcoming boss.
Follow the corridor down, past the left turn towards the bridge, and it will lead you to a Marauder standing atop some stairs. This Archer can cause problems so be stealthy in engaging him as he may alert the boss if he tries to keep his distance. Follow the corridor around and you will come towards some closed doors. Behind these is a small square room in which the Marauder Warlord patrols, along with the possibility of another Marauder either standing or sleeping around the corner of the hall leading out of the room. Take the Warlord out, and don't forget to loot the Battered Crate for some non-respawning Skooma, along with the boss chest, both of which are in the square room.
Occupants:
- 1 boss-level Marauder at location A on map
- 0-2 Campsite Marauders (each 50% probability melee Marauder, 16% archer Marauder, 16% Marauder Battlemage, 16% dog)
- 1 Marauder Battlemage
- 1 archer Marauder
- 1-2 melee Marauders
Treasure:
- 1 boss-level Chest (Marauder variety) at location B on map
- 1 A Battered Crate (contains 8 Skooma; non-respawning; locked, hard lock)
- 2 Chests 02 (both locked)
- 1 Chest 03
- 2 Chests 04
- The following ingredients will always be found: 1 Cheese Wedge
Traps:
- 1 Pressure Plate trigger at location E on map
- 2 Swinging Mace traps at D
Doors and Gates:
- There is one door (at C) in/out of this zone, leading to the zone Fort Alessia
- 1 Portcullis Gate at F
Other:
- 3 bedrolls at locations b on map


