Skyrim:Forelhost
|
|||
|---|---|---|---|
| # of Zones | 3 | ||
| Occupants | |||
| Dragon Cultists, Draugr, Skeevers, Rahgot | |||
| Important Treasure | |||
| Rahgot Dragon Priest Staff |
|||
| Console Location Code(s) | |||
| ForelhostBrokenTower, ForelhostExterior01, ForelhostExterior02, ForelhostExterior03, ForelhostExterior04, Forelhost01, Forelhost02, Forelhost03 | |||
| Region | |||
| The Rift | |||

Forelhost is a ruined fortress on a peak southeast of Riften which contains a word wall for the Storm Call shout. The ruins have an exterior courtyard and contain three interior zones: Forelhost Stronghold, Forelhost Crypt, and Forelhost Refectory.
Related Quests
- Alteration Ritual Spell: Acquire Kahvozein's Fang and use it to get heartscales from a dragon for Tolfdir. (radiant)
- Siege on the Dragon Cult: Enter the ruins of Forelhost and defeat Rahgot to recover his mask for Captain Valmir.
Walkthrough
Exterior
The courtyard of Forelhost contains a small campsite with a single tent. This is where Captain Valmir can be found, claiming to be an Imperial or Stormcloak officer, depending on your allegiance and progress in the civil war questline. He asks for your help, and can give you information on the history of the Dragon Cult, initiating the quest Siege on the Dragon Cult. The courtyard is surrounded by the remains of the walls and battlements, with a door leading into the stronghold.
The word wall is reachable by scaling the mountainside through a combination of jumping and/or using the Whirlwind Sprint shout, bypassing the dungeon entirely. The mountain slope northeast of the ruins, or the arch above the door to the ruins, can be climbed this way.
Forelhost Stronghold
The first zone of the fortress is partially in ruins. The direct route to the second zone is blocked by a portcullis, and you'll have to take a long, trapped path around behind it to reach the next zone. This zone is populated with the ghosts of the dragon cultists, which appear to be stealthed until you are quite close. Some of these are melee warriors, while others are mages. Later in the zone, you will also meet draugr.
One room contains a forge, a workbench, and a grindstone, as well as some iron ore and ingots. Skorm Snow-Strider's journal can be found here, providing additional background information on the fortress and the last days of the siege of the Dragon Cult's last stronghold.
Forelhost Crypt
The second zone consists of old burial crypts. To reach the third zone, you must pass down through the well. However, the well is enclosed in a cage secured by a master-level lock. You can either pick the lock or search through the other path to the back of the crypts, which contains the key to the well. Along that passage you will have to avoid a variety of traps, and face draugr and dragon cultists, some of which can summon frost atronachs.
Once you gain access to the well, you can swim through it and reach a cave area with some skeevers and the corpse of a frostbite spider. This area contains a quicksilver ore vein with a gold ore vein to its left, as well as an ancient note. Continuing on through, you reach the door to the third area. A copy of the Restoration skill book The Exodus can be found in the bookcase to your right.
Forelhost Refectory
You will soon find a room with a locked portcullis, a raised balcony to your right (with some draugr archers), and a passage to your left. On the table you will find Forelhost note 1 and 2. The latter will lead to a way around the room and back to the raised balcony. Be careful of traps (including weight sensitive plates and spellcaster traps) and draugr.
On the balcony level, further progress is blocked by a spear-gate with no obvious means of opening. Taking the glass claw from its pedestal opens this gate. This claw will provide a hint on how to open the puzzle door you will find ahead. This door provides access to the last room in the zone, and can be opened with the sequence (from outer to inner ring): Fox—Owl—Snake. Inside the last room you will meet Rahgot, dragon priest of Alduin, and bearer of the eponymous mask. As you approach his resting tomb, he will rise, along with four leveled draugr, to attack you. This can prove to be a very challenging battle at higher levels, as you will likely be facing several draugr deathlords, along with Rahgot.
It is possible to split the group, making it easier to defeat. You only need to go as far as the top of the steps for Rahgot and the draugr to rise. Once they do, quickly returning back down the steps and to the other end of the previous room can draw the first two draugr away. It is also possible to draw the other two out of the main room in the same way, making all four easier to dispatch.
Rahgot's main offense is fire, in the form of fire-based Destruction spells, the high-damage fire walls produced by his staff, and the flame atronach he can summon. Rahgot carries his mask as well as a key to Forelhost Battlements. There is a ceiling spike trap in the floor heading toward the main chamber. This could be used against the draugr when fighting, but also against you if you step into the center of the floor.
Exterior: Forelhost Battlements
The door behind Rahgot's tomb opens onto the balcony above the entry door in the courtyard. Make your way around to the right to find the word wall bearing one of the words of the Storm Call shout. From here you can jump down to the courtyard, where the tent is.
Notes
- The glass claw gate may not retract when the claw is taken. To fix this, place an object on the pedestal where the claw was resting, then take that item to release the door.
- The glass claw may get knocked off it's pedestal and onto the ground if spells of blast effect were cast nearby.
- The ghosts are considered NPCs, and thus cannot be soul-trapped in regular soul gems. Black soul gems are required.
- One of the traps encountered within the fortress is triggered by a weight sensitive plate on a pedestal (currently held in place by a potion). When the potion is removed, a volley of darts will be fired, and continue firing until another weight of some sort is placed on the trigger.
- The above mentioned trap sometimes cannot be reset via placing another object upon the pedestal. You can reload the game from the previous autosave (the door just entered) and it may reset the trap. Then, being careful to NOT trigger the trap again, stay to the right hand side of the wall.
- Even with the Sneak perk Light Foot, the traps will all be activated by your weight.
- If you haven't chosen between Imperial and Stormcloak yet, Captain Valmir can be either, with both types inside.
- The first few cultists carry an inordinate amount of arrows, up to 126 each.
- The cultists wear ancient Nord armor, the only location where all pieces of this type of armor may be looted at once.
- The Dragon Cultists can be detected with the Detect Dead spell before they go hostile.
- Many of the battles revolve around large amounts of Draugr gathered around a trap of some kind, making many battles hazardous. Ranged weapons are suggested.
Bugs
- If the puzzle door does not work, check here for possible fixes.
Maps
-
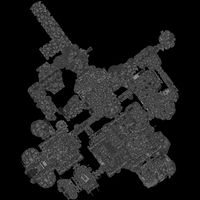
Forelhost Stronghold
-
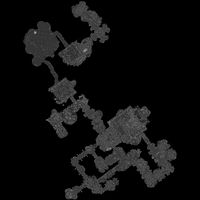
Forelhost Crypt
-
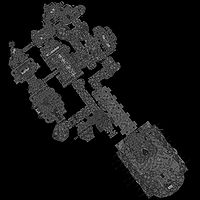
Forelhost Refectory


- Uses Deprecated Namespace Variable
- Skyrim-Places-Nordic Ruins
- Skyrim-Places
- MetaTemplate-Load
- Páginas com etiquetas HTML auto-fechadas inválidas
- Skyrim-Confirmed Bugs
- Skyrim-Places-The Rift
- Skyrim-Places-Gold Veins
- Skyrim-Places-Quicksilver Veins
- Skyrim-Places-Alchemy Labs
- Skyrim-Places-Arcane Enchanters
- Skyrim-Places-Forges
- Skyrim-Places-Grindstones
- Skyrim-Places-Workbenches
- Skyrim-Places-Word Walls
- Skyrim-Places-Clearable
- Skyrim-Places-Discoverable
- Skyrim-Places-Dragon Priest Lairs